
Web App for Containers lets you run your custom Docker image packaging your web application. It's a great Azure offering that helps developers to package their
application and all related dependencies in a container and then host
the container on the Azure Web App.
It's a win-win situation for many organization where they can bundle their application in a container and then leverage the full power of Azure App Service platform to do the hosting, security, networking, auto scaling, load balancing, CDN, A/B testing, deployment slots, alerts and monitoring. What else do you need! 🙏
But there's a limitation. You can deploy only one docker image to an App Service as of today (Docker Compose and Kubernetes options of web app for containers are still in preview while writing this post). So this allows you to use Docker as a Service, but isn't intended for deploying Microservices. For such requirement you must check Azure Service Fabric or Azure Kubernetes Service which are specially tuned to deal with microservice deployments at scale.
OK! Let's deploy our containerized web application into Azure web app for containers.
Prerequisites:
- Azure Subscription (Free subscription of 30 days will also do)
- Basic docker knowledge (If you want to create your own containerized app, else not required)
For the sake of making this article short I had already created an happyegg application (my favourite 😊) in Asp.Net Core, packaged it inside a Linux image and pushed it to docker hub repository. As this image is publicly available, you are free to use it if you want. Else you can go ahead and create your own application in a language of your choice and dockerize it inorder to get going.
- Login to Azure (If you do not have any subscription already then create one else login to your existing one)
- Search for "Web App for Containers'

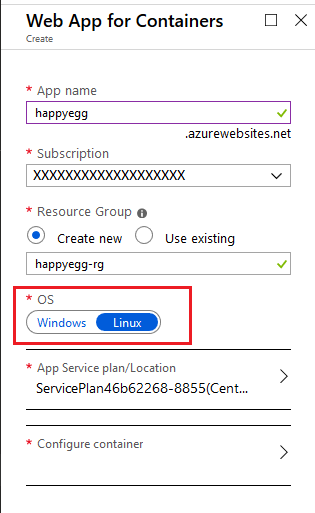
- Fill up the basic details. I have selected "Linux" as OS since my happyegg app is a linux based image. Fill up the details as per your choice and click on "Configure container"
- Select "Single Container" (default) tab. Select "Docker Hub" as Image source since my image is available there, "Public" as Repository Access and put the image as "atanudochub/happyegg:latest" (If you want to use my happyegg image). For private registry you need to provide your username/password. Apart from that Azure Container Registry can also be your source.
Click "Apply"

- Click "Create" to kickoff the service creation process. This will create an App Service Plan along with your App Service.

- Open the happyegg App Service and hit the URL.

- A cute little smiling and dancing egg will pop up in your browser. Voila! Our App Service had successfully downloaded the happyegg image from the docker hub repository and running it in Azure. Auto Magic 👋

Moreover, If you go to the "Container settings" in the Settings blade of your web app, it will also show you a nice little log of what happened behind the scene to run our image. Awesome!

Well Done! and congratulations for coming this far.
Hope this article will help to have a good understanding on the topic and would encourage you to dig further. Do share with me
about your experience and what you have built upon
this foundation.
I would love to hear from you.
I would love to hear from you.
No comments:
Post a Comment