Search

13 July, 2019

Azure Application Gateway & Web App - Did you fixed this security flaw

I often see that people put an Azure Application Gateway in front of their Azure Web App and feels very secure. The have done everything in the Gateway by configuring WAF, front-end and backend pools, routing rules , listeners, http/https settings and what not;  but missed one vital point. What's that? 😟

Let's simulate the security loophole

Web App (default).
Launch the endpoint of our web application.


Application Gateway
The same web endpoint now accessed through the API Gateway's public IP


Can you guess the security glitch here. Yes you are right. Your user has two endpoints now to access you application and so for the hackers 😈. They can easily bypass your gateway security gate and can directly access your application open for attacks.

So, what we are missing in our setup. A very important configuration. We need to make our website ONLY accessible via the gateway.

  • Go to the Networking blade of your web application and click on "Configure Access Restrictions" under Access Restrictions

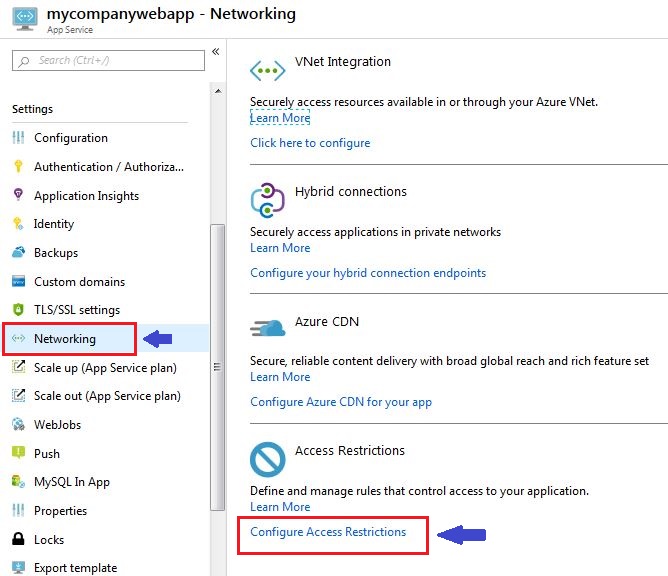
  • By default you can see it allows access from any source. Click "+ Add" 

  • This is the important window. Here make sure you select "Virtual Network" as type, virtual network of your application gateway and its corresponding subnet. Here we are saying the web application to grant access only request coming from this VNET and not publicly. Click "Add Rule"
  •  Wait for few seconds. You can see now the public access is denied and the app gateway is only allowed. That's it.

Hit your web application endpoint. 403 Error. You have successfully restricted direct application endpoint access. Great.


Now hit the endpoint of your application gateway. No problem here, it's still serving our web application. 


Good Job! You have successfully fixed a very important security glitch.

Congratulations. 👍👍


10 July, 2019

Create a real-life Bot with Azure Web App Bot service

Bots are now everywhere. In almost every web site nowadays, a bot shows up in some form or the other to make us interact with it in a question answer pattern. I had searched the web to gain knowledge on bot service based on a near real-life scenario but failed to come up with a simplified content. Either it's too verbose or explained in a complicated fashion trying to cover everything at one go. So, decided to come up with one by myself. You can follow along! 😐

Scenario:
Class X board exam results are out and thousands of students from all over the country will now start banging the board website to know their result. The board had already decided to come with an intelligent bot service in their website which will  help the students with their results in an interactive way. Simple ask right?  Come on! Let's dive ...

Please note that I have purposefully left out some complex areas or haven’t deep dived into details somewhere inorder to make this article an easy read and help as a quick guide from where to start in the Microsoft Azure Web Bot space and Bot Framework.

Prerequisites:
  1. Azure Subscription (Free subscription of 30 days will also do)
  2. Microsoft Visual Studio 2017
  3. Bot Framework v4 SDK Templates for Visual Studio (Install if not already installed)
  4. Bot Framework Emulator (recommended, Install if not already installed)
To start with, we first need data for our application. By data I mean the result database. Now this is not an every day event and hence we do not need a full blown featured database for this. So, we will leverage Azure table storage which fits perfectly fine for this event and also won't come heavy on the customer with cost.
  • Login to Azure (If you do not have any subscription already then create one else login to your existing one)
  • Create a storage account (Check here if you want to know the steps). I gave my storage account name as "stgbotdemo" and location as "Southeast Asia" for this demo
  • Copy the Connection string from the "Access Keys" properties of the storage account blade and keep it in a notepad for later use
  • Now go to the "Table service" of the storage account and add a new table "+ Table". Give the table name as "boardresults" (or as per your choice) and hit "OK"

  • The table will get created and will show up in the display windows with the URL.
  • Now lets quickly populate the table with some data which will simulate subject-wise marks against each student. Go the Storage explorer >> Tables >> boardresults and hit the "+ Add" button at the top. I have used the online storage explorer (preview) for this demo, you can also download the azure storage explorer and use that as well.
  • Now quickly define the table properties. We will use the PartitionKey as class, RowKey as roll number (unique), status as Pass/Fail and would add subjects like English, Mathematics, Science, History, Geography and Computer. Name of the student as the last property. Sample as below
  • Click "Insert" at the bottom and repeat the above step multiple times so that you have a fair collection of student records. Just keep the PartitionKey as fixed "ClassX". Note that in real world you won't be performing this manual inserts as you would be having some automated process to insert data into your table storage. But for this demo it's just fine.
Done! We have the desired data now to work with. Let's create the bot 😎

Visual Studio Application 

  •  Fire up Visual Studio 2017 and select File >> New >> Project >> Bot Framework. Select "Echo Bot" as your project type. Choose the project name as per your choice (I have given boardExamResultsBot). Click OK
  • Right click on the project and select "Manage NuGet Packages" from the menu. Browse for "Storage" and install "WindowsAzure.Storage" package into your project. This will be used to access the storage and storage table we just created in Azure.
  • Now lets quickly add a POCO class in our project consisting the storage table properties. Right click on the project and "Class". Name it as "boardResults.cs". Replace the code with the following code.
using System;
using System.Collections.Generic;
using System.Linq;
using System.Threading.Tasks;
using Microsoft.WindowsAzure.Storage.Table;

namespace boardExamResultsBot
{
    public class boardResults : TableEntity
    {
        public string Status { get; set; }        
        public Int32 English { get; set; }
        public Int32 Mathematics { get; set; }
        public Int32 Science { get; set; }        
        public Int32 History { get; set; }
        public Int32 Geography { get; set; }
        public Int32 Computer { get; set; }
        public string Name { get; set; }
    }
}
  • Open appsettings.json file and add your Azure Storage connection string which you have copied earlier in a notepad and the Storage Tablename. Don't worry about the MicrosoftAppId and MicrosoftAppPassword config settings for now. We will come back to this.
{
  "MicrosoftAppId": "",
  "MicrosoftAppPassword": "",
  "StorageConnectionString": "DefaultEndpointsProtocol=https;AccountName=stgbotdemo;AccountKey=XXXXXXXXXXXXXXXXXXXXXXXXXXXXxxxxxxxxxxxxHdSIB4TOf4nUHpACU9xRvfQWcRIxzHUTQX3uk4Z8dtFtSoxAQ==;EndpointSuffix=core.windows.net",
  "StorageTableName": "boardresults"
}
  • Open "EchoBot.cs" under Bot folder and add the following namespace under the using section
using Microsoft.WindowsAzure.Storage;
using Microsoft.WindowsAzure.Storage.Table;
using Microsoft.Extensions.Configuration;
using System.Text;
  • Add the below code under the class "EchoBot" as first statements. We are using .Net Core and by the magic of it's dependency injection the following statements will automatically read the settings of the appsettings.json configuration file. 
readonly IConfiguration _configuration;

public EchoBot(IConfiguration configuration)
{
   _configuration = configuration;
}
  • Now we need to read student's data from our table storage. Copy and paste the below code. These are simple Table commands on how to retrieve data from Azure Table storage and casting the same into our POCO class objects in return. I have hard-coded the PartitionKey as "ClassX" here but you can also read this from the configuration file.
public async Task<boardResults> RetrieveRecord(string rowKey)
{
    CloudStorageAccount storageAccount = CloudStorageAccount.Parse(_configuration["StorageConnectionString"]);
    CloudTableClient client = storageAccount.CreateCloudTableClient();
    CloudTable table = client.GetTableReference(_configuration["StorageTableName"]);            
    TableOperation retOp = TableOperation.Retrieve<boardResults>("ClassX", rowKey);
    TableResult tr = await table.ExecuteAsync(retOp);
    return tr.Result as boardResults;   
}
  • Now the calling and ornamentation part. Overwrite the OnMessageActivityAsync method with the following code. It's commented and very much self explanatory
protected override async Task OnMessageActivityAsync(ITurnContext<IMessageActivity> turnContext, CancellationToken cancellationToken)
{
   //Calling the RetreiveRecord function with the roll number entered by the user in the chat window
   boardResults bResult = await RetrieveRecord(turnContext.Activity.Text);

   //Ornamentation before returning the data back to user in chat window
   StringBuilder msg = new StringBuilder();
   msg.Append("Name : " + bResult.Name);
   msg.Append("\nYour have " + bResult.Status);
   msg.Append("\nEnglish : " + bResult.English);
   msg.Append("\nMathematics : " + bResult.Mathematics);
   msg.Append("\nScience : " + bResult.Science);
   msg.Append("\nHistory : " + bResult.History);
   msg.Append("\nGeography : " + bResult.Geography);
   msg.Append("\nComputer : " + bResult.Computer);

   //Flash out the result to the chat window
   await turnContext.SendActivityAsync(MessageFactory.Text(msg.ToString()), cancellationToken);
}
  • Change the initial message of MessageFactory.Text() in the OnMembersAddedAsync method with this "Hi! Please enter your Roll Number". This is the message which will show up when the user first starts to interact with the bot. So asking for the roll number is s valuable input there inorder to proceed.
Great! we are done. Now lets test our bot.
  • Press F5 to run the application and copy the full localhost URL from the browser.
  • Fire up you Bot simulator and add your localhost endpoint. Make sure to add /api/messages at the end of the URL. This is important. Click "Save" and launch the bot from Endpoint panel (If not launched automatically)
  • The greeting message will pop up asking for the roll number. Enter a roll number (any RowKey value from the table) and hit enter. Voila! the bot is returning the result against that roll number. Try with different roll number and see various results. Bulls Eye 👍

So, we are now having an working bot fetching results from Azure storage table based on user input of roll numbers. Lets take it further and deploy our bot to Azure.
  • Go to Azure and search for Bot services

  • Click Add and select "Web app Bot" from the list and then click "Create"


  • Fill up the details as usual per your choice. For Pricing tier select the F0 option which is more than enough for this demo. We do not need Application Insights here so you can turn it off. Make sure to create an App Service plan as well. Click "Create"

  • Wait for few minutes for Azure to set up the bot service for you. Once done, go the the "Setting" blade of your bot application and copy the MicrosoftAppId and MicrosoftAppPassword values from there.

  • Paste the values in your projects's appsettings.json file against each placeholders. These are mappings we need to configure so that the Bot Services in Azure recognizes the app and authenticates properly. Now you got why I have left these properties blank earlier.
{
  "MicrosoftAppId": "XXXXXXXXXXXXXXXXXXXXXXXXX", //Corresponding Id of the azure bot app
  "MicrosoftAppPassword": "XXXXXXXXXXXXXXXXXXXX",      //Corresponding Password of the azure bot app
  "StorageConnectionString": "DefaultEndpointsProtocol=https;AccountName=stgbotdemo;AccountKey=XXXXXXXXXXxHdSIB4TOf4nUHpACU9xRvfQWcRIxzHUTQX3uk4Z8dtFtSoxAQ==;EndpointSuffix=core.windows.net",
  "StorageTableName": "boardresults"
}
Done! Our Bot service is now up and ready in Azure. Lets deploy our bot there.
  • Right click on the project and hit "Publish" Select "Existing" and "App Service" from the list and click "Publish"
  • The system will automatically recognize your bot service in Azure and will show in the list. Select it and hit "OK"

Wait for few seconds if not minutes for publish to finish. The browser will launch to notify that the bot is up and running


You can test it in cloud by going to the "Test in Web Chat" window of the bot service. Say "hi" and then the rest would follow as usual.


Cool! You have done it 👍

You might be thinking that OK, that's fine but how to use in an web application. Great question. What's the use of this bot if we cannot embed it in our application. For that go to the "Channels" property page of the bot service and select Edit against your Web Chat line item. The html embedding code is already generated for you. Just copy the code and replace the YOUR_SECRET_HERE section with any of the secret key as highlighted and you are good to go.


Congratulations! for coming this far. Hope this article will boost up your self confidence and would encourage you to further explore this service.

Do share with me about your experience and what you have built upon this foundation. You can take it upto any level and integrate. I would love to hear from you.

02 July, 2019

Developed & Released : "Azure Updates" mobile app

Developed a small mobile application (Android only) for all my Azure friends out there.

Learn about every important Azure product updates, roadmap, and announcements.

The app brings all the latest Azure updates at your fingertips. Its combines the world of Azure product updates into one single place with a very simple, easy to understand interface.  So, you would never miss any update and can update yourself on the move. Isn't that great!

The app is completely free. So keep updating yourself and make use of it in your Cloud journey.

I would love to hear from you.

Download from: