
Let's take up this challenge and create a small POC around it. Azure Data Factory came to rescue. If you are not already familiar with this service yet then I would encourage you to give it a look. It's a great service which can solve many of your data related needs. In our case the need is to copy files between AWS ==> AZURE
Prerequisites:
- Azure Subscription (Free account will do)
- AWS Subscription (Free account will do)
First let's take a look at AWS side from where the files needs to be copied, i.e the source. You can see that I have a S3 bucket (iot-aws-data) containing 10 files under "iot" folder". These files are nothing but plain json files containing the data generated from sensors.
{
   "readingId" : "1001eee1",
   "readingDate" : "2020-01-04",
   "sensorId" : 2345,
   "level" : 4
}

Now before we can think of copying data, we need to have credentials to get into AWS S3 bucket. It's not recommended to use the root credentials so let's create an user with admin privilege in our AWS account.
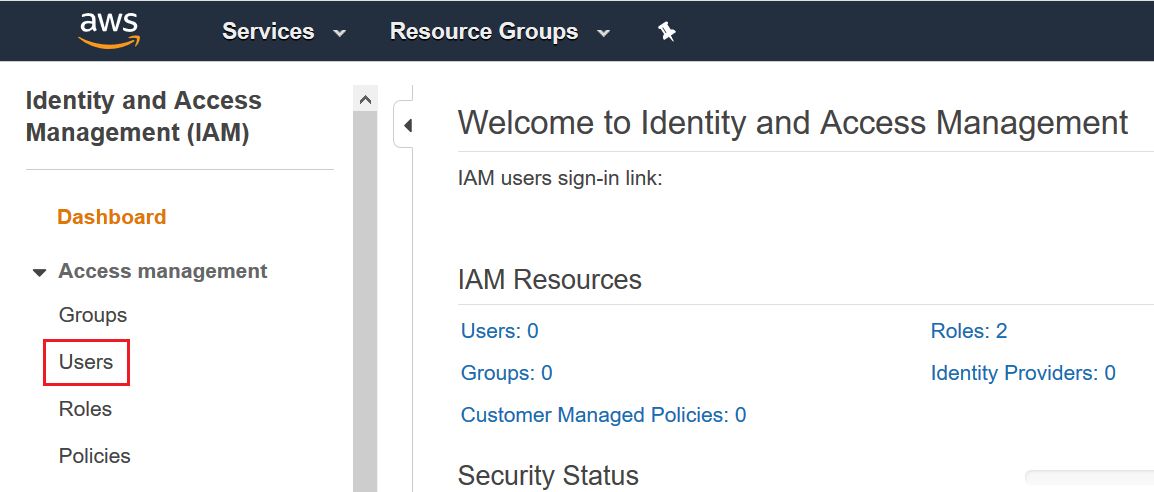
Click on Services. Type IAM in the search bar and click as highlighted below

Click Users and then click the "Add user" button in the next screen
Give the user name of your choice (I have given AzureUser 😉). Tick the checkboxes and click the "Next Permission" button

In the next screen select the following as below and then click next >> next and create the user

The user with administrator access will be created. Now a vital step. Don't forget to note down the Access key ID and Secret access key from the screen. Keep those in notepad which will need later.

DONE from the AWS cloud side. So, let dive into Azure.
Search for "Data factory" in the Azure search bar and select as highlighted below

Fill in the details as per your choice. Make sure you un-check the "Enable GIT" checkbox as it's not required for this demo else you will have to fill in more additional details pertaining to that. Click "Create"

Once created go to your data factory overview page and click "Author & Monitor" to launch ADF dashboard.

Click on "Create Pipeline"

Give a name of our choice for your pipeline (I have given AwsS3ToAzureBlob) and select the Copy data activity under Move & transform and drag it to the area right as shown in the below screen

Select the activity if not already selected and give a meaningful name of your choice (I have given CopyFilesAwsToAzure). Click on the "Source" tab (next to the General tab)

Click +New against the "Source dataset" drop-down and select Amazon S3. Click "Continue"

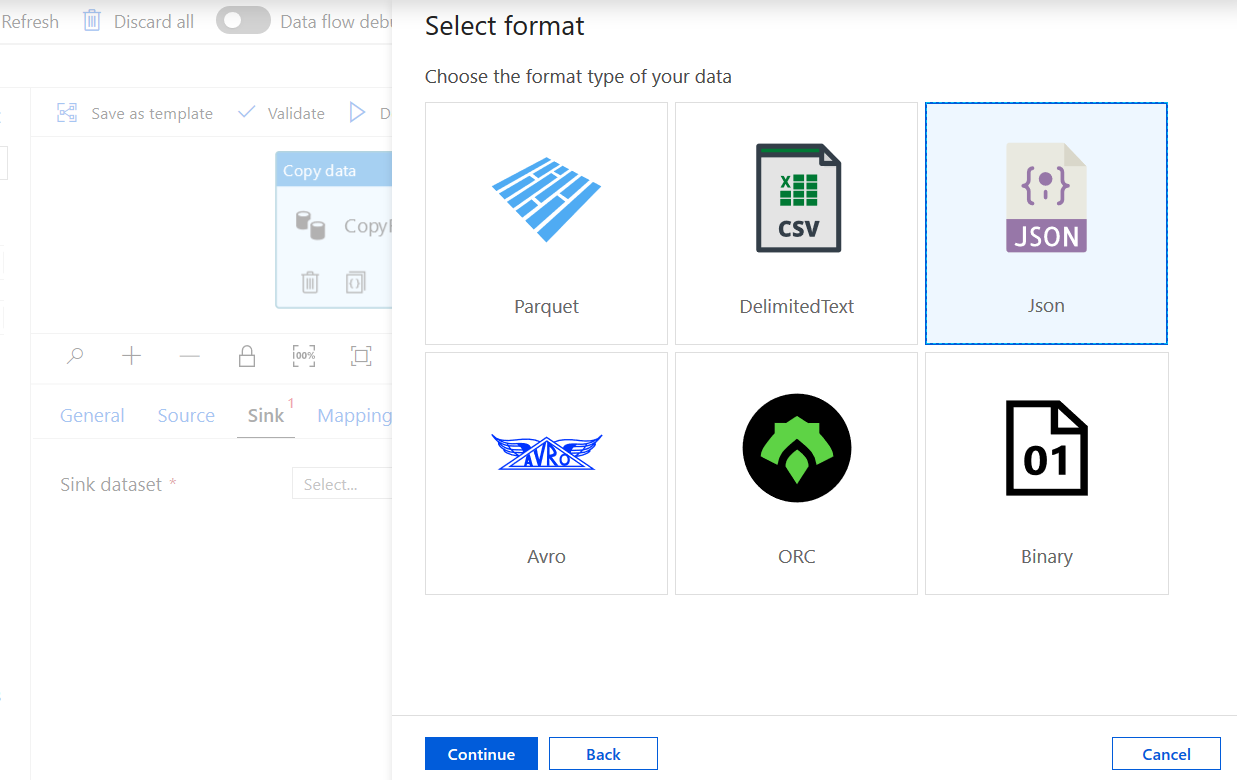
Select "JSON" as format and click "Continue"

Give a name of your choice in the properties window and select "New" from the list for linked service

In the next window we need to provide our AWS credentials
Name: free text
Connect via integration runtime: Leave the default AutoResolveIntegrationRuntime
Access Key ID: << the access key id you had copied from the AWS create user screen >>
Secret Access Key: << the secret access key id you had copied from the AWS create user screen >>
Hit the "Test connection" at the bottom. If it succeeds (it should) Click Create

Click the "Browse" button and select your AWS S3 bucket from the list. Click OK

Now we need to copy all files and not just one file. So select "Wildcard file path" and provide the folder name of the AWS S3 bucket containing all the files and the file name as "*.json" (this should be the default as well).
Scroll down a bit and also provide the Max concurrent connections to 2 (choice is yours) as we also want to copy files in parallel.
You can also view the data if you wish by hitting the Preview data button.

We are done with the source part. Now click the Sink tab and hit "+New" against the Sink dataset drop-down. Select "Azure Blob Storage" and hit Continue

Select "JSON" as format and click "Continue"
Give a name of your choice in the properties window and select "New" from the list for linked service

In the next window we need to provide our Azure Blob information
Name: free text
Connect via integration runtime: Leave the default AutoResolveIntegrationRuntime
Authentication method: << Account key >> ..... There are other options as well
Azure subscription: << Select the correct azure subscription >>
Storage account name: << select the storage account >> .... You must have created the storage account
Hit the "Test connection" at the bottom. If it succeeds (it should) Click Create

Click the "Browse" button and select your Azure storage container from the list. Click OK

We are done with the Sink part well.
Now as a last step hit the "Validate all" button at the top and then hit the "Publish all" button. Both should pass without any issue. Please note that you need to publish/deploy the pipeline before using it.
Cool... Now lets run the pipeline. Click on Add trigger >> Trigger now. Click Finish in the next window to fire up the copy process.

Once fired, you can monitor the progress from the monitor window. Its "In progress". Keeping finger crossed 😮

And it succeeds 😀

Great job!... now just do a quick check. Open your azure blob container and yep... the files are now indeed copied into it. 🙋

Congratulations! for coming this far. Hope this article will boost up your self confidence and would encourage you to further explore this service.
Do share with me about your experience and what you have built upon this foundation. I would love to hear from you.