Now what if there's a way where Azure would handle all the authentication and authorization mess for accessing a service so that we simply do not bother about storing secrets in code, configuration files, code repositories and headache of key rotations.
The answer is Azure Managed Identities. In the rest of this article we will see how we can store secrets in Azure Key Vaults and access the same from our code and Azure Web App without storing a single credential anywhere. Cool! Let's dive
Prerequisites:
- Azure Subscription (Free subscription of 30 days will also do)
- Microsoft Visual Studio 2017 (Asp.Net Core)
- Login to Azure (If you do not have any subscription already then create one else login to your existing one)
- Search for Key Vault in the search bar and select the service

- Click "+Add" in the top left to start the journey

- Fill up the Name, Resource Group, Location as per your choice. Leave other settings as default.
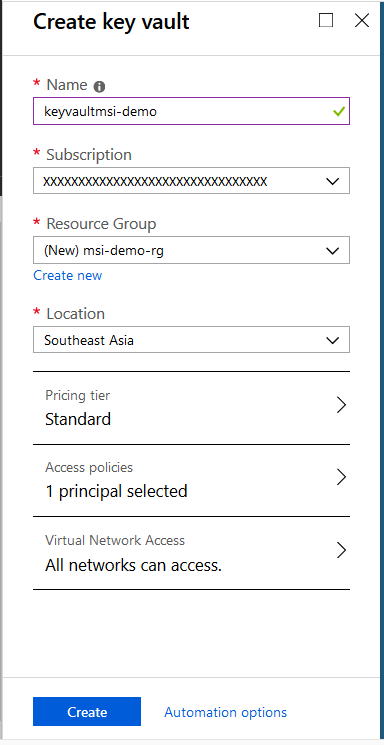
If you click the Access Policy property in the blade, you will see that your user is already selected by default. Click on "Create" to initiate the service provisioning. It will take few seconds if not minutes.

- Now lets add a secret value to our Key Vaults. Enter into the resource and go to its "Secrets" blade. Click on the "+Generate/Import" to add a secret and its value.

- Give your Secret name and value and leave others as default. I have given name as "HighSecret" and value as "Abradacabra!!!" (sound magical to me 😊). Click Create.

Within seconds it will be created and saved in your Key Vault

Perfect! Great going 👏 We are done with the Key Vault part. Now lets write some code and try accessing this secret without any service principal credentials.
Visual Studio Application – To see the action
- Fire up Visual Studio and select File >> New >> Project. Select “ASP.NET Core Web Application” as your project type. Choose the project name as per your choice (I have given keyvaultmsidemo-webapp). Click OK
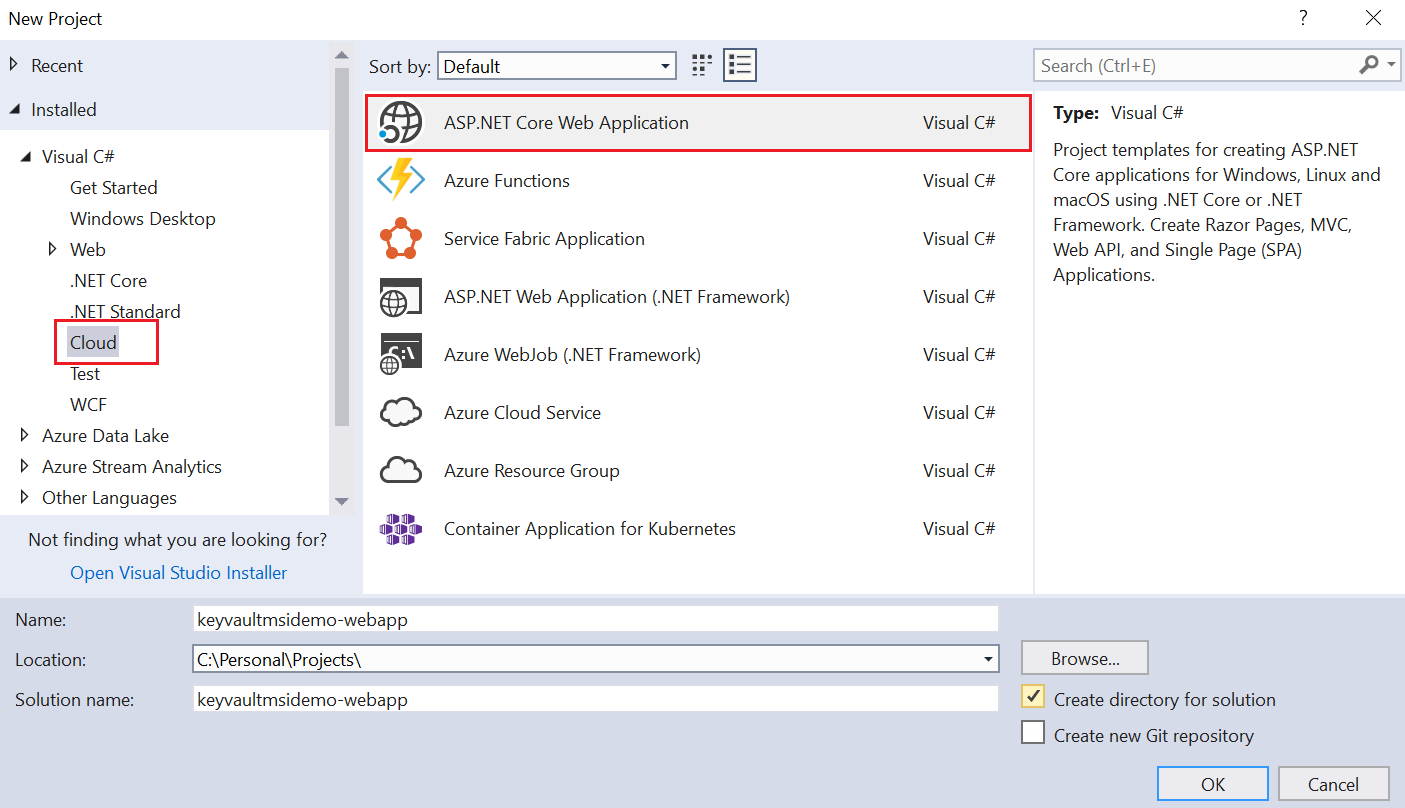
- Select "MVC" from the next window. You can also un-check the "Configure for HTTPS" support as this is not a requirement for this demo. Click OK

- We need to add to packages in our project (one for working with KeyVault and another for the Managed identity). The packages are:
Microsoft.Azure.KeyVault Microsoft.Azure.Services.AppAuthentication - Inorder to add, right click on your project >> Manage NuGet Packages

- Go to the Browse section and type/paste Microsoft.Azure.KeyVault in the search bar. The system will display the result. Select the service and click "Install" on the right. Repeat the same step to install package Microsoft.Azure.Services.AppAuthentication

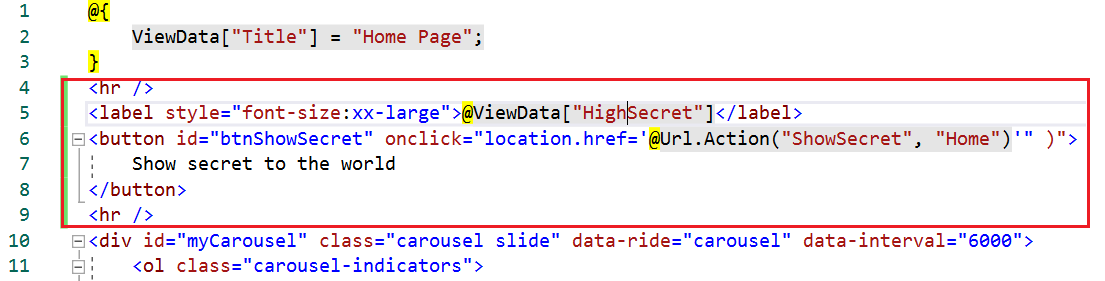
- First lets add a label and a button to the Index.cshtml page under Views>>Home. On this button click we will show the secret value in that label. Place your cursor in front of the very first "div" and press enter; then copy paste the below code there
<hr />
<label style="font-size:xx-large">@ViewData["HighSecret"]</label>
<button id="btnShowSecret" onclick="location.href='@Url.Action("ShowSecret", "Home")'" )">
    Show secret to the world
</button>
<hr />
The view should look similar to this. You can see the onclick event of the button is pointing to a ShowSecret action of the Home controller which we will define next.

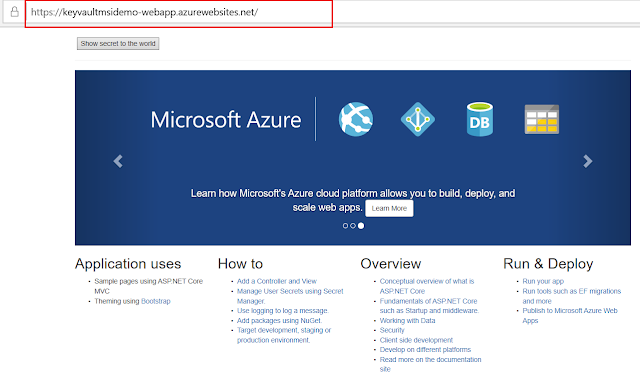
The browser will launch your application and the default .Net Core web app will display along with our button "Show secret to the world" at the top
 Hit the button and Voila! our secret value from the Key Vault is displayed. OMG moment 👌

Well Done! You have done everything right so far and the output is as expected. No hard-coded credentials anywhere anymore. Mission Accomplished. 👍 Ahhhh! not yet. Let's deploy our web application in Azure as till now it's running in our local box.
Right click on the project and hit "Publish" in the context menu. Select "App Service" as publish target and hit the Publish button at the bottom. Now check the default data populated by the system for you. If it looks all good the go-ahead and hit "Create".

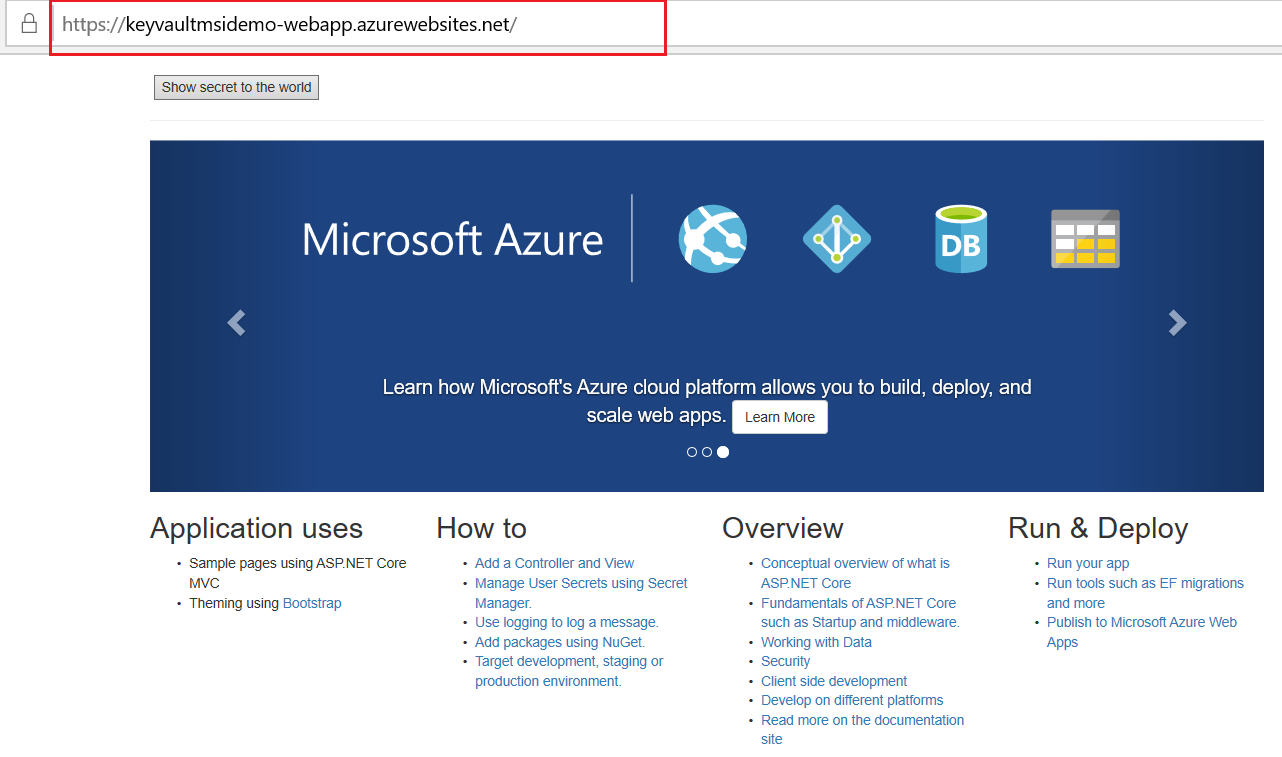
Wait for few minutes for Azure to provision your service. Once done it will automatically load it in your browser. Check the browser url; it will change to the endpoint of your web app in Azure.
Hit the "Show secret to the world" button. Boom 💥 Errrrrrooooor!

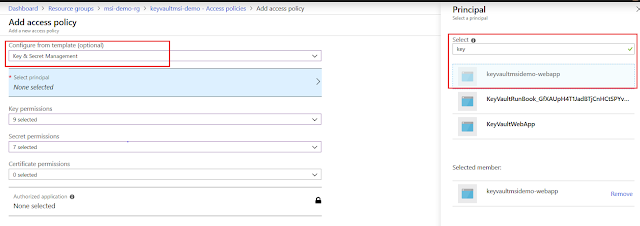
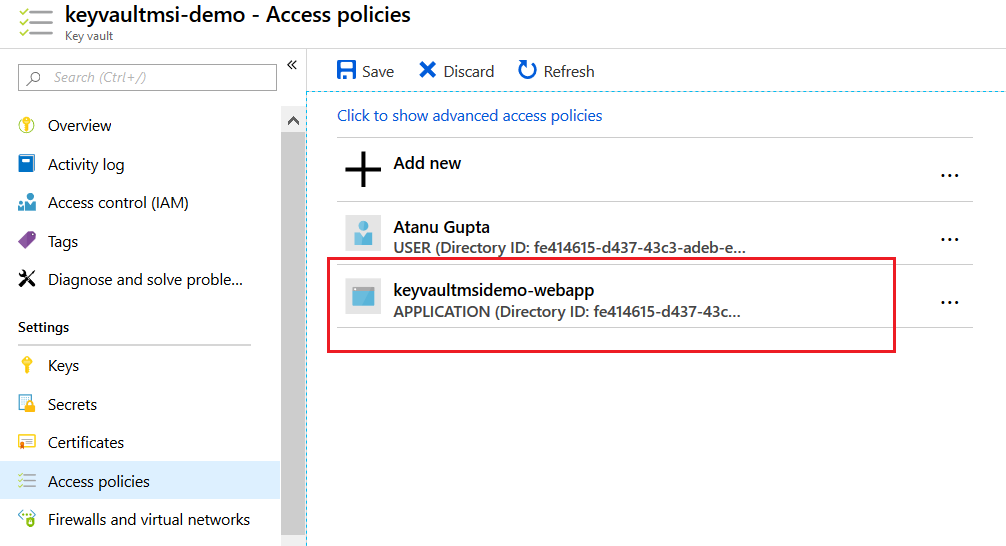
Oh No, what went wrong? Don't worry, it leads us to a very important point. Our web application is now running in Azure and this application do not have permission to access the Key Vault with Managed Identity. Then how come it's working in local environment? This is working because of the user account we are using to access the Vault has permission by default. Check it out. Go to your keyvault service in Azure and open the "Access Policy' blade.

Our Azure web application is not in the list and hence the error. Security! right. So let's add the web application. Click "+Add new" at the top. Select "Key & Secret Management" from the Configure template dropdown list. Hit the Secret principal option and then type your web application name (typing few words would also do). The system will auto populate all the services starting with the name. Select you web application from the list. Hit "Select" and then hit "OK".
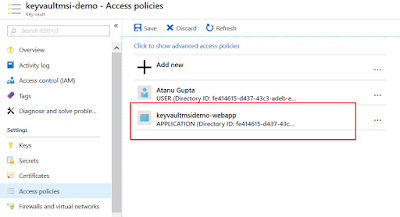
 The application will now show up in the Access policy list. Hit "Save" and we are done.
Now go back the browser url. You can find the URL from the App Service overview page.

Click the link to launch the web page in a browser. Hit the "Show secret to the world" button now and Hurray! the secret is displayed. Fantastic 👋👋

Hope this article will help to have a good understanding on Managed Identity and would encourage you to dig further. Do share with me about your experience and what you have built upon this foundation and also let me know if you want me to cover other areas of this service.
I would love to hear from you.
- Open the HomeController.cs under Controller folder of your solution and add the below two namespaces in the using section at the top
using Microsoft.Azure.KeyVault;
using Microsoft.Azure.Services.AppAuthentication;
- Now scroll down at the bottom of the file and add the below code.
public IActionResult ShowSecret()
{
   var tokenProvider = new AzureServiceTokenProvider();
   var keyVaultClient = new KeyVaultClient(new KeyVaultClient.AuthenticationCallback(tokenProvider.KeyVaultTokenCallback));
   var secretValue = keyVaultClient.GetSecretAsync($"https://keyvaultmsi-demo.vault.azure.net/", "HighSecret").Result;

   ViewData["HighSecret"] = secretValue.Value;

   return View("Index");
}
This is our ShowSecret() action which will return the secret value. Note that I have hard-coded the KeyVault Url (The DNS Name value which you can easily get from the overview blade of the KeyVault service we created in Azure portal) and the secret Name in the code. In real project these two should come from some configuration file.
The major point to notice here is that we haven't mentioned any authentication/authorization credential anywhere till now for accessing the Key Vault. The Managed Identity will take care of all these in the background. Really? lets check it out. Hit F5 and run the project.
The major point to notice here is that we haven't mentioned any authentication/authorization credential anywhere till now for accessing the Key Vault. The Managed Identity will take care of all these in the background. Really? lets check it out. Hit F5 and run the project.
The browser will launch your application and the default .Net Core web app will display along with our button "Show secret to the world" at the top


Well Done! You have done everything right so far and the output is as expected. No hard-coded credentials anywhere anymore. Mission Accomplished. 👍 Ahhhh! not yet. Let's deploy our web application in Azure as till now it's running in our local box.
Right click on the project and hit "Publish" in the context menu. Select "App Service" as publish target and hit the Publish button at the bottom. Now check the default data populated by the system for you. If it looks all good the go-ahead and hit "Create".

Wait for few minutes for Azure to provision your service. Once done it will automatically load it in your browser. Check the browser url; it will change to the endpoint of your web app in Azure.

Oh No, what went wrong? Don't worry, it leads us to a very important point. Our web application is now running in Azure and this application do not have permission to access the Key Vault with Managed Identity. Then how come it's working in local environment? This is working because of the user account we are using to access the Vault has permission by default. Check it out. Go to your keyvault service in Azure and open the "Access Policy' blade.

Our Azure web application is not in the list and hence the error. Security! right. So let's add the web application. Click "+Add new" at the top. Select "Key & Secret Management" from the Configure template dropdown list. Hit the Secret principal option and then type your web application name (typing few words would also do). The system will auto populate all the services starting with the name. Select you web application from the list. Hit "Select" and then hit "OK".

Now go back the browser url. You can find the URL from the App Service overview page.

Click the link to launch the web page in a browser. Hit the "Show secret to the world" button now and Hurray! the secret is displayed. Fantastic 👋👋

Hope this article will help to have a good understanding on Managed Identity and would encourage you to dig further. Do share with me about your experience and what you have built upon this foundation and also let me know if you want me to cover other areas of this service.
I would love to hear from you.