Showing posts with label AI. Show all posts

16 August, 2024

Securing Your LLM Applications: Detecting PII in Prompts with LLM-Guard ⚔️

In the era of Generative AI, where Large Language Models (LLMs) are increasingly woven into the fabric of modern applications, the need for safeguarding sensitive information has never been more critical. As organizations integrate LLMs into their workflows, the challenge of detecting and anonymizing Personally Identifiable Information (PII) in prompts — especially those processed in-memory — becomes paramount. Enter LLM Guard, your AI-powered sentinel in the battle against data exposure.

Why PII Matters: The Stakes Are High

PII is the linchpin of an individual’s digital identity. It’s not just a collection of data points; it’s a digital fingerprint that, when mishandled, can lead to dire consequences. Whether it’s GDPR or HIPAA, global regulations demand stringent measures for PII protection. But what happens when this sensitive information makes its way into LLM prompts? If left unchecked, it could inadvertently proliferate across storage points, model training datasets, and third-party services, amplifying the risk of data breaches and privacy violations.

Anatomy of a Privacy Breach: The Attack Surface

Consider this scenario: A company uses an LLM to automate customer service. The prompts sent to the LLM contain user queries, some of which include PII like names, addresses, or credit card numbers. If the model provider stores these prompts, either for improving the model or for other purposes, the PII is now exposed to risks outside of the company’s control. This scenario underscores the importance of ensuring that any PII in prompts is detected and anonymized before it ever reaches the LLM.

The Role of Anonymize Scanner in LLM Guard

The Anonymize Scanner within LLM Guard acts as your digital guardian, scrutinizing prompts in real-time and ensuring they remain free from PII. Here’s how it works:

  • PII Detection: The scanner identifies PII entities across various categories, including credit card numbers, personal names, phone numbers, URLs, email addresses, IP addresses, UUIDs, social security numbers, crypto wallet addresses, and IBAN codes.
  • Anonymization: Once detected, the scanner can anonymize or redact this information, ensuring that the LLM only processes sanitized data.
  • In-Memory Operation: Unlike traditional methods that might focus on data at rest or in transit, LLM Guard operates directly on prompts in RAM, offering real-time protection without the latency of I/O operations.

Understanding PII Entities: A Closer Look

Let’s break down the types of PII the Anonymize Scanner targets:

  • Credit Cards: The scanner is adept at identifying credit card formats, including specific patterns like those for Visa or American Express.
  • Names: It recognizes full names, including first, middle, and last names, ensuring that any personally identifiable name data is flagged.
  • Phone Numbers: From a simple 10-digit number to complex international formats, the scanner is equipped to detect various phone number patterns.
  • URLs & Email Addresses: Whether it’s a URL pointing to a personal site or an email address in a customer query, the scanner can identify and anonymize these elements.
  • IP Addresses: Both IPv4 and IPv6 addresses are within the scanner’s purview, crucial for applications dealing with network data.
  • UUIDs & Social Security Numbers: Unique identifiers and social security numbers are some of the most sensitive data types, and the scanner is finely tuned to detect these.
  • Crypto Wallets & IBANs: As financial transactions become more digital, detecting and anonymizing crypto wallet addresses and IBAN codes is vital to prevent fraud and ensure compliance.

Detecting PII in Prompts Using LLM Guard

To illustrate the power of LLM Guard, let’s walk through a sample yet practical example. Below is a Python snippet that demonstrates how to use the Anonymize scanner to detect and redact PII in a prompt before it is processed by an LLM:

# Install the necessary package
pip install llm_guard

# Importing required modules
from llm_guard import scan_prompt
from llm_guard.input_scanners import Anonymize

# Define a prompt that contains PII
prompt = """Make an SQL insert statement to add a new user to our database.
Name is John Doe.
Email is test@test.com.
Phone number is 555-123-4567."""


# Scan the prompt for PII and sanitize it
sanitized_prompt, results_valid, results_score = scan_prompt(input_scanners, prompt)

# Check if the prompt contains any invalid PII data
if any(results_valid.values()) is False:
print(f"Prompt {prompt} is not valid, scores: {results_score}")
exit(1)

# Output the sanitized prompt
print(f"Prompt: {sanitized_prompt}")

Output:


Explanation:

  • The scan_prompt function utilizes the Anonymize scanner to inspect the prompt for any PII entities.
  • The scanner detects sensitive information such as names, email addresses, and phone numbers, replacing them with placeholders like [REDACTED_PERSON_1], [REDACTED_EMAIL_ADDRESS_1], and [REDACTED_PHONE_NUMBER_1].
  • The sanitized prompt is then printed, showcasing how the PII has been effectively anonymized.

This real-time detection and redaction process is crucial for maintaining the privacy and security of your data when interfacing with LLMs.

Fortifying Your LLM Applications

Integrating LLM Guard into your application stack is more than just a compliance checkbox; it’s a proactive stance in the ongoing battle for data privacy. By ensuring that PII is detected and anonymized in-memory, before it even has a chance to be processed by an LLM, you’re not only protecting your users but also fortifying your applications against potential breaches.

In a world where AI is becoming omnipresent, LLM Guard offers a robust solution to a critical problem. Don’t wait for a breach to prioritize PII protection — make it a cornerstone of your LLM deployment strategy.

Stay tuned for more on LLM-Guard guardrail features. 🙂

03 July, 2024

✨Building a Smart Image Parser with .NET, Semantic Kernel, and GPT-4o 🧿

Hey there, tech enthusiasts! Today, we’re diving into the magical world of AI, .NET, and the Semantic Kernel. Imagine a world where you provide an image URL, and in just a few lines of code, your program analyzes every tiny detail in that image. Sounds cool, right? Well, buckle up, because we’re about to embark on a fun journey to create exactly that!


The Magic Ingredients

Here’s what we’ll be using:

  • .NET (because we love a sturdy framework)
  • Semantic Kernel (because semantics matter, folks)
  • GPT-4o (the brain behind the operation)

Without further ado, let’s jump into the code snippets and see how we can make this happen.

The Controller — Where the Magic Begins

First, we need to set up our controller. This is where all the action happens. Let’s take a look at the code:


using Microsoft.AspNetCore.Mvc;
using Microsoft.SemanticKernel;
using Microsoft.SemanticKernel.ChatCompletion;

namespace AzureSemanticKernel.AI.Controllers
{
public class OpenAiController : Controller
{
private string open_ai_key = Environment.GetEnvironmentVariable("OPEN_AI_KEY");
private string open_ai_org = Environment.GetEnvironmentVariable("OPEN_AI_ORG_ID");

[HttpPost]
public async Task<string> GetGpt4oImageResponse(string imgUrl)
{
try
{
var kernelBuilder = Kernel.CreateBuilder();

kernelBuilder.AddOpenAIChatCompletion("gpt-4o", open_ai_key, open_ai_org);

var kernel = kernelBuilder.Build();

var chat = kernel.GetRequiredService<IChatCompletionService>();

var history = new ChatHistory();
history.AddSystemMessage("You are a friendly and helpful assistant that responds to questions directly");

var message = new ChatMessageContentItemCollection
{
new TextContent("Can you do a detail analysis and tell me all the minute details that present in this image?"),
new ImageContent(new Uri(imgUrl))
};

history.AddUserMessage(message);

var result = await chat.GetChatMessageContentAsync(history);

return result.Content;
}
catch (Exception ex)
{
return ex.Message;
}
}
}
}

Breaking Down the Magic

Let’s dissect this code and understand what each part does.

1. Namespace and Using Statements:

  • Just the usual suspects. Nothing to see here. Add those packages and move on!

2. Controller Setup:

  • We create an OpenAiController and define our API key and organization ID from environment variables. Remember, hard-coding keys is like leaving your front door open with a "Please Rob Me" sign.

3. GetGpt4oImageResponse Method:

  • This is where the fun begins! We define an asynchronous method to process the image URL.
  • Kernel Creation: We create a kernel builder and add our GPT-4o chat completion service. Think of the kernel as the magical cauldron where all the ingredients mix together.
  • Chat Service: We get the chat service from the kernel. This service is like our friendly neighborhood barista who knows exactly how we like our coffee.
  • Chat History: We initialize the chat history and add a system message to set the tone for our AI assistant. We want our assistant to be friendly and helpful, just like your favorite support agent.
  • User Message: We create a message collection with a text prompt and the image URL. This is like giving the barista your order — “I want a detailed analysis with extra foam, please!”
  • Response Handling: We send the message to the chat service and wait for the response. If all goes well, we return the content. If something goes wrong, we catch the exception and return the error message (because nobody likes an unhandled exception ruining the party).

Configuration — The Secret Sauce

Finally, let’s not forget the configuration setup in Program.cs:

using DotNetEnv;

Env.Load();

This simple line ensures our environment variables are loaded, so our API keys and organization IDs are safely tucked away. It’s like having a secret recipe locked in a vault.

Wrapping Up

And there you have it! In just a few lines of code, we’ve created a powerful image parser that uses .NET, Semantic Kernel, and GPT-4o to analyze images and return detailed descriptions. Now you can impress your friends, family, and maybe even your boss with your new found AI prowess.

Remember, the key to keeping your code exciting is to blend functionality with a dash of humor and a sprinkle of creativity. Happy coding, and may your bugs be few and your features be many! 🎉

28 June, 2024

✨Building an Engaging Chat Program with Azure OpenAI and .NET Semantic Kernel 🧿

In the ever-evolving landscape of artificial intelligence and cloud computing, creating interactive and intelligent applications has become more accessible and powerful. Today, we’ll dive into the fascinating world of integrating Azure OpenAI with .NET Semantic Kernel to build a simple yet engaging chat program. This blog post will walk you through the key components of the application, highlighting the elegance and efficiency of the integration.


Setting the Stage: Loading Configuration

The first step in our journey is setting up the environment configuration. Using the DotNetEnv library, we can effortlessly load environment variables from a .env file. This approach keeps our sensitive information secure and makes the configuration process seamless.

using DotNetEnv;

Env.Load();

This line of code ensures that our application can access the necessary Azure OpenAI credentials and other configuration details stored in the .env file.

Initializing the Kernel: The Common Class

The heart of our chat program lies in the initialization of the Semantic Kernel. The Common class is responsible for setting up the kernel using the credentials and model details from the environment variables.

using Microsoft.SemanticKernel;

namespace AzureSemanticKernel.AI
{
public static class Common
{
private static string key = Environment.GetEnvironmentVariable("AZURE_OPENAI_KEY");
private static string model = Environment.GetEnvironmentVariable("AZURE_OPENAI_MODEL");
private static string endpoint = Environment.GetEnvironmentVariable("AZURE_OPENAI_ENDPOINT");

public static Kernel initializeKernel()
{
var kernelBuilder = Kernel.CreateBuilder();
kernelBuilder.Services.AddAzureOpenAIChatCompletion(model, endpoint, key);
var kernel = kernelBuilder.Build();

return kernel;
}
}
}

In this class, we retrieve the API key, model, and endpoint from the environment variables and use them to configure the kernel. The initializeKernel method creates and returns a fully initialized kernel ready to handle chat requests.

Bringing It All Together: The Main Controller

Now that we have our configuration and kernel setup, let’s look at how we can create a simple yet powerful chat controller. The SimpleController class is where the magic happens. It receives user messages, processes them using the Semantic Kernel, and returns the responses.

using Microsoft.AspNetCore.Mvc;
using Microsoft.SemanticKernel;

namespace AzureSemanticKernel.AI.Controllers
{
public class SimpleController : Controller
{
[HttpPost]
public async Task<string> GetChatKernelResponse(string userMessage)
{
try
{
var kernel = Common.initializeKernel();

var result = await kernel.InvokePromptAsync(userMessage);

return result.ToString();
}
catch (Exception ex)
{
return ex.Message;
}
}
}
}

The GetChatKernelResponse action handles POST requests with user messages. It initializes the kernel, invokes the chat completion prompt, and returns the response. Error handling ensures that any exceptions are caught and their messages are returned to the user.


Conclusion

By leveraging Azure OpenAI and .NET Semantic Kernel, we’ve created a simple yet robust chat program with just few lines of code. This integration demonstrates the power and flexibility of modern AI and cloud technologies. Whether you’re a seasoned developer or just starting, this project showcases how easily you can build engaging and intelligent applications.

As AI continues to evolve, the possibilities for creating interactive and responsive applications are endless. Dive into the code, experiment with different models and prompts, and unleash the full potential of Azure OpenAI and .NET Semantic Kernel in your projects. Happy coding!


06 June, 2024

Bringing AI to Your Fashion Shop: Meet ShopBot, Your Friendly Shopping Assistant! 🛒

Welcome to the future of online shopping! Imagine having a friendly assistant right at your fingertips, ready to help you navigate through a variety of stylish clothing, accessories, and more. Say hello to ShopBot, an AI-powered assistant for your Fashion Shop, designed to enhance your shopping experience and make it more enjoyable than ever.

In this blog post, we’ll try to simulate a shopping store and dive into the exciting world of AI in e-commerce, showcase how ShopBot works, and provide you with all the code snippet to get started with your very own AI shopping assistant.

Why AI in E-Commerce?

Artificial Intelligence has revolutionized many industries, and e-commerce is no exception. Here are a few reasons why integrating AI into your online store can be a game-changer:

  • Personalized Shopping Experience: AI can tailor recommendations based on customer preferences and browsing history.
  • 24/7 Customer Support: AI chatbots can assist customers at any time, providing instant responses and support.
  • Efficient Navigation: AI can help customers find products quickly and easily, enhancing their overall shopping experience.

Introducing ShopBot

ShopBot is an AI assistant designed specifically for aFashion Shop. It assists customers in browsing products, providing information, and guiding them through the checkout process. Let’s see how you can create your very own ShopBot using Python, Streamlit and Azure Open AI

Setting Up ShopBot

Here’s a step-by-step guide to creating ShopBot. The code below demonstrates how to use Azure OpenAI, Streamlit, and a predefined product list to build an engaging shopping assistant.

Step 1: Import Required Libraries

First, import the necessary libraries:

import os
from openai import AzureOpenAI
from dotenv import load_dotenv
from langchain_core.messages import AIMessage, HumanMessage
import streamlit as st

Step 2: Load Environment Variables

Load your environment variables to access your Azure OpenAI API keys:

load_dotenv()

Step 3: Define the Product List

Here’s a sample product list. Credit goes to Yennhi95zz’s medium blog post for this comprehensive list:

product_list = '''
# Fashion Shop Product List

## Women's Clothing:
- T-shirt
- Price: $20
- Available Sizes: Small, Medium, Large, XL
- Available Colors: Red, White, Black, Gray, Navy

- Elegant Evening Gown
- Price: $150
- Available Sizes: Small, Medium, Large, XL
- Available Colors: Black, Navy Blue, Burgundy

- Floral Summer Dress
- Price: $45
- Available Sizes: Small, Medium, Large
- Available Colors: Floral Print, Blue, Pink

- Professional Blazer
- Price: $80
- Available Sizes: Small, Medium, Large, XL
- Available Colors: Black, Gray, Navy

## Men's Clothing:
- Classic Suit Set
- Price: $200
- Available Sizes: Small, Medium, Large, XL
- Available Colors: Charcoal Gray, Navy Blue, Black

- Casual Denim Jeans
- Price: $35
- Available Sizes: 28, 30, 32, 34
- Available Colors: Blue Denim, Black

- Polo Shirt Collection
- Price: $25 each
- Available Sizes: Small, Medium, Large, XL
- Available Colors: White, Blue, Red, Green

## Accessories:
- Stylish Sunglasses
- Price: $20
- Available Colors: Black, Brown, Tortoise Shell

- Leather Handbag
- Price: $60
- Available Colors: Brown, Black, Red

- Classic Wristwatch
- Price: $50
- Available Colors: Silver, Gold, Rose Gold

## Footwear:
- High-Heel Ankle Boots
- Price: $70
- Available Sizes: 5-10
- Available Colors: Black, Tan, Burgundy

- Comfortable Sneakers
- Price: $55
- Available Sizes: 6-12
- Available Colors: White, Black, Gray

- Formal Leather Shoes
- Price: $90
- Available Sizes: 7-11
- Available Colors: Brown, Black

## Kids' Collection:
- Cute Cartoon T-shirts
- Price: $15 each
- Available Sizes: 2T, 3T, 4T
- Available Colors: Blue, Pink, Yellow

- Adorable Onesies
- Price: $25
- Available Sizes: Newborn, 3M, 6M, 12M
- Available Colors: Pastel Blue, Pink, Mint Green

- Trendy Kids' Backpacks
- Price: $30
- Available Colors: Blue, Red, Purple

## Activewear:
- Yoga Leggings
- Price: $30
- Available Sizes: Small, Medium, Large
- Available Colors: Black, Gray, Teal

- Running Shoes
- Price: $40
- Available Sizes: 6-12
- Available Colors: White, Black, Neon Green

- Quick-Dry Sports T-shirt
- Price: $20
- Available Sizes: Small, Medium, Large
- Available Colors: Red, Blue, Gray

'''

Step 4: Create the Context for ShopBot

Define the context for your AI assistant:

def get_context():
context = [{'role': 'system',
'content': f"""
You are ShopBot, an AI assistant for my online fashion shop - My Fashion Shop.
Your role is to assist customers in browsing products, providing information, and guiding them through the checkout process.
Be friendly and helpful in your interactions. We offer a variety of products across categories such as Women's Clothing,
Men's clothing, Accessories, Kids' Collection, Footwears and Activewear products.
Feel free to ask customers about their preferences, recommend products, and inform them about any ongoing promotions.
The Current Product List is limited as below:

```{product_list}```

Make the shopping experience enjoyable and encourage customers to reach out if they have any questions or need assistance.
"""
}]
return context

Step 5: Define the Function to Get AI Responses

Create a function to get responses from the AI:

def get_completion_from_messages(messages):
client = AzureOpenAI(
api_key = os.environ["AZURE_OPENAI_API_KEY"],
api_version = os.environ["API_VERSION"],
azure_endpoint = os.environ["AZURE_OPENAI_ENDPOINT"]
)

chat_completion = client.chat.completions.create(
model = os.environ["DEPLOYMENT_MODEL"],
messages = messages
)

return chat_completion.choices[0].message.content

Step 6: Initialize Streamlit Session State

Initialize the chat history and context:

if "chat_history" not in st.session_state:
st.session_state.chat_history = [
AIMessage(content="Hello! I'm your Ecom Assistant. How can I help you today"),
]

if "chat_msg" not in st.session_state:
st.session_state.chat_msg = get_context()

Step 7: Set Up Streamlit UI

Configure Streamlit page and display the chat interface:

st.set_page_config(page_title="Chat with My Shop", page_icon=":speech_balloon:")

st.title("Ecommerce Chatbot :speech_balloon:")


for message in st.session_state.chat_history:
if isinstance(message, AIMessage):
with st.chat_message("AI"):
st.markdown(message.content)
elif isinstance(message, HumanMessage):
with st.chat_message("Human"):
st.markdown(message.content)

Step 8: Handle User Input

Capture and respond to user queries:

user_query = st.chat_input("Type a message...")
if user_query is not None and user_query.strip() != "":
st.session_state.chat_msg.append({"role" : "user", "content" : f"{user_query}"})
st.session_state.chat_history.append(HumanMessage(content=user_query))

with st.chat_message("Human"):
st.markdown(user_query)

with st.chat_message("AI"):
with st.spinner("Please wait ..."):
response = get_completion_from_messages(st.session_state.chat_msg)
st.markdown(response)

st.session_state.chat_msg.append({"role" : "user", "content" : f"{response}"})
st.session_state.chat_history.append(AIMessage(content=response))

Step 8: Run the application

Run the app:

streamlit run <<yourapp>>.py

Try It Yourself!

That’s it! You’ve now created your very own AI shopping assistant. With ShopBot, your customers can enjoy a personalized and efficient shopping experience, making them feel valued and well-assisted. Whether they need recommendations, product details, or help with the checkout process, ShopBot is here to help.

Feel free to customize the product list and enhance the functionality to suit your store’s unique needs. Happy coding and happy shopping!


30 May, 2024

Integrating Azure Cognitive Services with OpenAI for interactive Voice-based AI Responses 🤖🎤

In today's fast-moving digital world, mixing top-notch AI tech is opening up endless chances for cool experiences. When we combine Azure Cognitive Services, which are really good at understanding speech, with OpenAI, which is great at understanding natural language, magic happens. It lets us make AI systems that talk back to us in real time, understanding what we say like it's second nature. Jump into the world where Azure meets OpenAI, and see how it's changing the way we interact with computers.

In this blog post, we’ll explore a Python script that achieves this integration, enabling a fully interactive voice-based AI system.


Overview

The script leverages Azure’s Speech SDK to recognize spoken language and OpenAI’s language model to generate responses. The process involves several key steps:

  1. Loading Environment Variables: Using dotenv to manage API keys securely.
  2. Configuring Azure Speech SDK: Setting up speech recognition and synthesis.
  3. Invoking OpenAI API: Using the recognized speech to generate a response.
  4. Synthesizing AI Response: Converting the AI-generated text back to speech.

Let’s delve into the details.

Prerequisites

Before you start, ensure you have the following:

  • Azure Cognitive Services subscription with Speech API.
  • OpenAI API key.
  • Python environment with necessary libraries installed (azure-cognitiveservices-speech, python-dotenv, langchain_openai).

Code Walkthrough

Below is the complete script with comments to guide you through each section:

import os
from dotenv import load_dotenv
import azure.cognitiveservices.speech as speechsdk
from langchain_openai import OpenAI

# Load environment variables from a .env file
load_dotenv()

# Retrieve API keys from environment variables
AZURE_SPEECH_KEY = os.getenv("AZURE_SPEECH_KEY")
AZURE_SPEECH_REGION = os.getenv("AZURE_SPEECH_REGION")
OPENAI_API_KEY = os.getenv("OPENAI_API_KEY")

# Initialize the OpenAI language model with the API key
llm = OpenAI(api_key=OPENAI_API_KEY)

# Configure Azure Speech SDK for speech recognition
speech_config = speechsdk.SpeechConfig(subscription=AZURE_SPEECH_KEY, region=AZURE_SPEECH_REGION)
speech_config.speech_recognition_language = "en-US"

# Set up the audio input from the default microphone
audio_config = speechsdk.audio.AudioConfig(use_default_microphone=True)
speech_recognizer = speechsdk.SpeechRecognizer(speech_config=speech_config, audio_config=audio_config)

print("You can speak now. I am listening ...")

# Start speech recognition
speech_recognition_result = speech_recognizer.recognize_once_async().get()

# Check the result of the speech recognition
if speech_recognition_result.reason == speechsdk.ResultReason.RecognizedSpeech:
output = speech_recognition_result.text
print(output) # User question

# Invoke the OpenAI API with the recognized speech text
result = llm.invoke(output)
print(result) # AI Answer

# Configure audio output for speech synthesis
audio_config = speechsdk.audio.AudioOutputConfig(use_default_speaker=True)
speech_synthesizer = speechsdk.SpeechSynthesizer(speech_config=speech_config, audio_config=audio_config)

# Synthesize the AI response into speech
speech_synthesizer_result = speech_synthesizer.speak_text_async(result).get()

elif speech_recognition_result.reason == speechsdk.ResultReason.NoMatch:
print("No speech could be recognized: {}".format(speech_recognition_result.no_match_details))

elif speech_recognition_result.reason == speechsdk.ResultReason.Canceled:
cancellation_details = speech_recognition_result.cancellation_details
print("Speech Recognition canceled: {}".format(cancellation_details.reason))
if cancellation_details.reason == speechsdk.CancellationReason.Error:
print("Error details: {}".format(cancellation_details.error_details))

Step-by-Step Breakdown

1. Loading Environment Variables

Using the dotenv package, we load sensitive API keys from a .env file, ensuring they are not hard-coded in the script.

2. Configuring Azure Speech SDK

We set up the Azure Speech SDK with the necessary subscription key and region. This configuration allows the SDK to access Azure’s speech recognition services.

3. Speech Recognition

The SpeechRecognizer object listens for speech input via the default microphone and processes the speech to text asynchronously. Upon recognition, it checks the result and extracts the recognized text.

4. Invoking OpenAI API

The recognized text is then passed to OpenAI’s language model, which generates a relevant response. This integration allows for dynamic interaction, where the AI can understand and respond contextually.

5. Speech Synthesis

Finally, the AI-generated text response is synthesized back into speech using Azure’s SpeechSynthesizer, providing a spoken response through the default speaker.

Error Handling

The script includes basic error handling for different outcomes of the speech recognition process:

  • RecognizedSpeech: When speech is successfully recognized.
  • NoMatch: When no speech is recognized.
  • Canceled: When the recognition process is canceled, potentially due to errors.

Conclusion

Integrating Azure Cognitive Services with OpenAI creates a powerful platform for developing interactive voice applications. This combination leverages the robust speech recognition and synthesis capabilities of Azure with the advanced natural language understanding of OpenAI. Whether for virtual assistants, customer support, or other innovative applications, this integration showcases the potential of modern AI technologies.

Feel free to experiment with the code and adapt it to your specific use case. The possibilities are endless when combining these advanced tools in creative ways.

10 July, 2019

Create a real-life Bot with Azure Web App Bot service

Bots are now everywhere. In almost every web site nowadays, a bot shows up in some form or the other to make us interact with it in a question answer pattern. I had searched the web to gain knowledge on bot service based on a near real-life scenario but failed to come up with a simplified content. Either it's too verbose or explained in a complicated fashion trying to cover everything at one go. So, decided to come up with one by myself. You can follow along! 😐

Scenario:
Class X board exam results are out and thousands of students from all over the country will now start banging the board website to know their result. The board had already decided to come with an intelligent bot service in their website which will  help the students with their results in an interactive way. Simple ask right?  Come on! Let's dive ...

Please note that I have purposefully left out some complex areas or haven’t deep dived into details somewhere inorder to make this article an easy read and help as a quick guide from where to start in the Microsoft Azure Web Bot space and Bot Framework.

Prerequisites:
  1. Azure Subscription (Free subscription of 30 days will also do)
  2. Microsoft Visual Studio 2017
  3. Bot Framework v4 SDK Templates for Visual Studio (Install if not already installed)
  4. Bot Framework Emulator (recommended, Install if not already installed)
To start with, we first need data for our application. By data I mean the result database. Now this is not an every day event and hence we do not need a full blown featured database for this. So, we will leverage Azure table storage which fits perfectly fine for this event and also won't come heavy on the customer with cost.
  • Login to Azure (If you do not have any subscription already then create one else login to your existing one)
  • Create a storage account (Check here if you want to know the steps). I gave my storage account name as "stgbotdemo" and location as "Southeast Asia" for this demo
  • Copy the Connection string from the "Access Keys" properties of the storage account blade and keep it in a notepad for later use
  • Now go to the "Table service" of the storage account and add a new table "+ Table". Give the table name as "boardresults" (or as per your choice) and hit "OK"

  • The table will get created and will show up in the display windows with the URL.
  • Now lets quickly populate the table with some data which will simulate subject-wise marks against each student. Go the Storage explorer >> Tables >> boardresults and hit the "+ Add" button at the top. I have used the online storage explorer (preview) for this demo, you can also download the azure storage explorer and use that as well.
  • Now quickly define the table properties. We will use the PartitionKey as class, RowKey as roll number (unique), status as Pass/Fail and would add subjects like English, Mathematics, Science, History, Geography and Computer. Name of the student as the last property. Sample as below
  • Click "Insert" at the bottom and repeat the above step multiple times so that you have a fair collection of student records. Just keep the PartitionKey as fixed "ClassX". Note that in real world you won't be performing this manual inserts as you would be having some automated process to insert data into your table storage. But for this demo it's just fine.
Done! We have the desired data now to work with. Let's create the bot 😎

Visual Studio Application 

  •  Fire up Visual Studio 2017 and select File >> New >> Project >> Bot Framework. Select "Echo Bot" as your project type. Choose the project name as per your choice (I have given boardExamResultsBot). Click OK
  • Right click on the project and select "Manage NuGet Packages" from the menu. Browse for "Storage" and install "WindowsAzure.Storage" package into your project. This will be used to access the storage and storage table we just created in Azure.
  • Now lets quickly add a POCO class in our project consisting the storage table properties. Right click on the project and "Class". Name it as "boardResults.cs". Replace the code with the following code.
using System;
using System.Collections.Generic;
using System.Linq;
using System.Threading.Tasks;
using Microsoft.WindowsAzure.Storage.Table;

namespace boardExamResultsBot
{
    public class boardResults : TableEntity
    {
        public string Status { get; set; }        
        public Int32 English { get; set; }
        public Int32 Mathematics { get; set; }
        public Int32 Science { get; set; }        
        public Int32 History { get; set; }
        public Int32 Geography { get; set; }
        public Int32 Computer { get; set; }
        public string Name { get; set; }
    }
}
  • Open appsettings.json file and add your Azure Storage connection string which you have copied earlier in a notepad and the Storage Tablename. Don't worry about the MicrosoftAppId and MicrosoftAppPassword config settings for now. We will come back to this.
{
  "MicrosoftAppId": "",
  "MicrosoftAppPassword": "",
  "StorageConnectionString": "DefaultEndpointsProtocol=https;AccountName=stgbotdemo;AccountKey=XXXXXXXXXXXXXXXXXXXXXXXXXXXXxxxxxxxxxxxxHdSIB4TOf4nUHpACU9xRvfQWcRIxzHUTQX3uk4Z8dtFtSoxAQ==;EndpointSuffix=core.windows.net",
  "StorageTableName": "boardresults"
}
  • Open "EchoBot.cs" under Bot folder and add the following namespace under the using section
using Microsoft.WindowsAzure.Storage;
using Microsoft.WindowsAzure.Storage.Table;
using Microsoft.Extensions.Configuration;
using System.Text;
  • Add the below code under the class "EchoBot" as first statements. We are using .Net Core and by the magic of it's dependency injection the following statements will automatically read the settings of the appsettings.json configuration file. 
readonly IConfiguration _configuration;

public EchoBot(IConfiguration configuration)
{
   _configuration = configuration;
}
  • Now we need to read student's data from our table storage. Copy and paste the below code. These are simple Table commands on how to retrieve data from Azure Table storage and casting the same into our POCO class objects in return. I have hard-coded the PartitionKey as "ClassX" here but you can also read this from the configuration file.
public async Task<boardResults> RetrieveRecord(string rowKey)
{
    CloudStorageAccount storageAccount = CloudStorageAccount.Parse(_configuration["StorageConnectionString"]);
    CloudTableClient client = storageAccount.CreateCloudTableClient();
    CloudTable table = client.GetTableReference(_configuration["StorageTableName"]);            
    TableOperation retOp = TableOperation.Retrieve<boardResults>("ClassX", rowKey);
    TableResult tr = await table.ExecuteAsync(retOp);
    return tr.Result as boardResults;   
}
  • Now the calling and ornamentation part. Overwrite the OnMessageActivityAsync method with the following code. It's commented and very much self explanatory
protected override async Task OnMessageActivityAsync(ITurnContext<IMessageActivity> turnContext, CancellationToken cancellationToken)
{
   //Calling the RetreiveRecord function with the roll number entered by the user in the chat window
   boardResults bResult = await RetrieveRecord(turnContext.Activity.Text);

   //Ornamentation before returning the data back to user in chat window
   StringBuilder msg = new StringBuilder();
   msg.Append("Name : " + bResult.Name);
   msg.Append("\nYour have " + bResult.Status);
   msg.Append("\nEnglish : " + bResult.English);
   msg.Append("\nMathematics : " + bResult.Mathematics);
   msg.Append("\nScience : " + bResult.Science);
   msg.Append("\nHistory : " + bResult.History);
   msg.Append("\nGeography : " + bResult.Geography);
   msg.Append("\nComputer : " + bResult.Computer);

   //Flash out the result to the chat window
   await turnContext.SendActivityAsync(MessageFactory.Text(msg.ToString()), cancellationToken);
}
  • Change the initial message of MessageFactory.Text() in the OnMembersAddedAsync method with this "Hi! Please enter your Roll Number". This is the message which will show up when the user first starts to interact with the bot. So asking for the roll number is s valuable input there inorder to proceed.
Great! we are done. Now lets test our bot.
  • Press F5 to run the application and copy the full localhost URL from the browser.
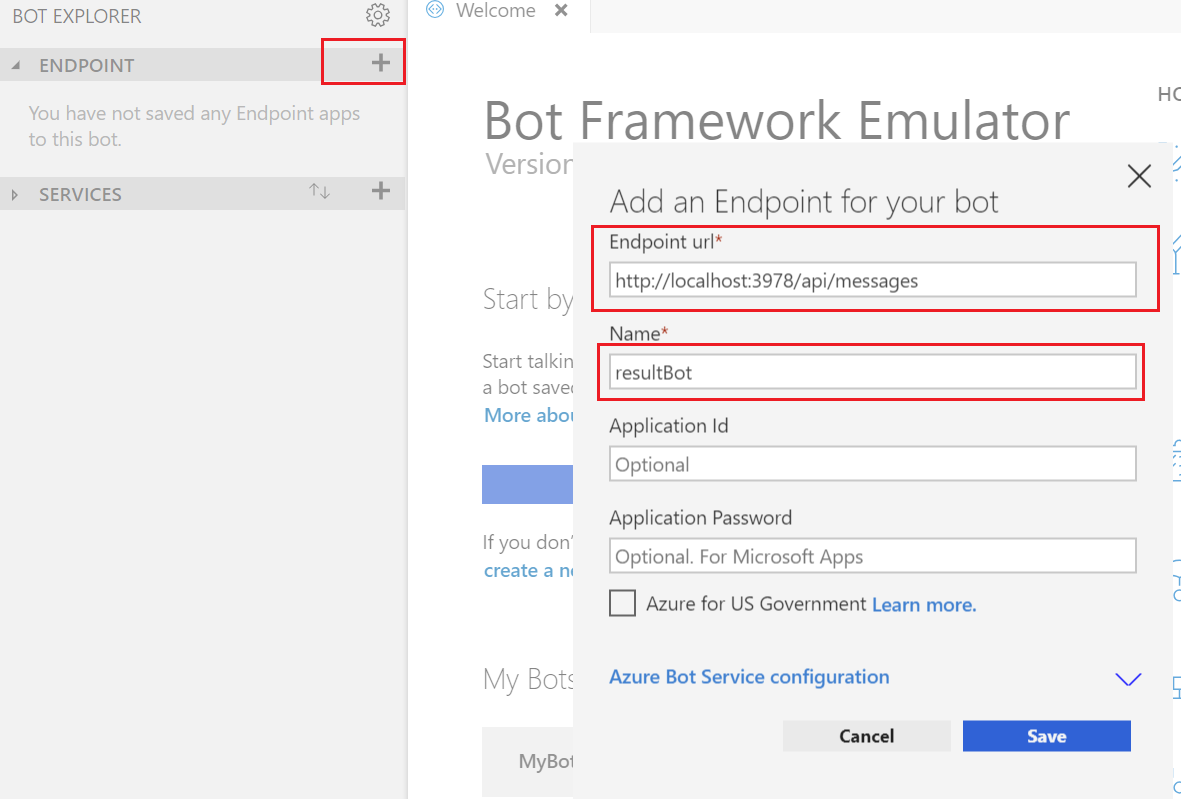
  • Fire up you Bot simulator and add your localhost endpoint. Make sure to add /api/messages at the end of the URL. This is important. Click "Save" and launch the bot from Endpoint panel (If not launched automatically)
  • The greeting message will pop up asking for the roll number. Enter a roll number (any RowKey value from the table) and hit enter. Voila! the bot is returning the result against that roll number. Try with different roll number and see various results. Bulls Eye 👍

So, we are now having an working bot fetching results from Azure storage table based on user input of roll numbers. Lets take it further and deploy our bot to Azure.
  • Go to Azure and search for Bot services

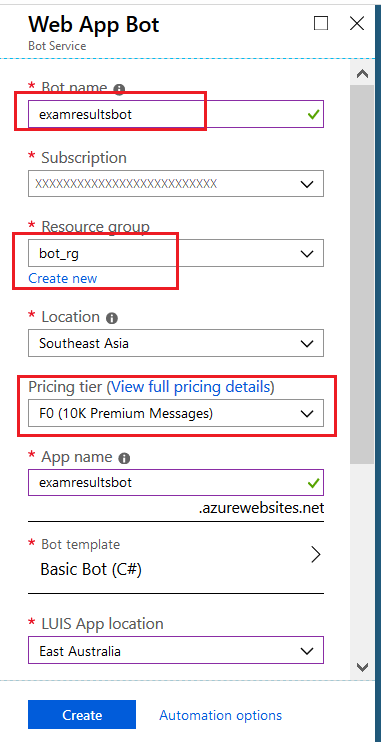
  • Click Add and select "Web app Bot" from the list and then click "Create"


  • Fill up the details as usual per your choice. For Pricing tier select the F0 option which is more than enough for this demo. We do not need Application Insights here so you can turn it off. Make sure to create an App Service plan as well. Click "Create"

  • Wait for few minutes for Azure to set up the bot service for you. Once done, go the the "Setting" blade of your bot application and copy the MicrosoftAppId and MicrosoftAppPassword values from there.

  • Paste the values in your projects's appsettings.json file against each placeholders. These are mappings we need to configure so that the Bot Services in Azure recognizes the app and authenticates properly. Now you got why I have left these properties blank earlier.
{
  "MicrosoftAppId": "XXXXXXXXXXXXXXXXXXXXXXXXX", //Corresponding Id of the azure bot app
  "MicrosoftAppPassword": "XXXXXXXXXXXXXXXXXXXX",      //Corresponding Password of the azure bot app
  "StorageConnectionString": "DefaultEndpointsProtocol=https;AccountName=stgbotdemo;AccountKey=XXXXXXXXXXxHdSIB4TOf4nUHpACU9xRvfQWcRIxzHUTQX3uk4Z8dtFtSoxAQ==;EndpointSuffix=core.windows.net",
  "StorageTableName": "boardresults"
}
Done! Our Bot service is now up and ready in Azure. Lets deploy our bot there.
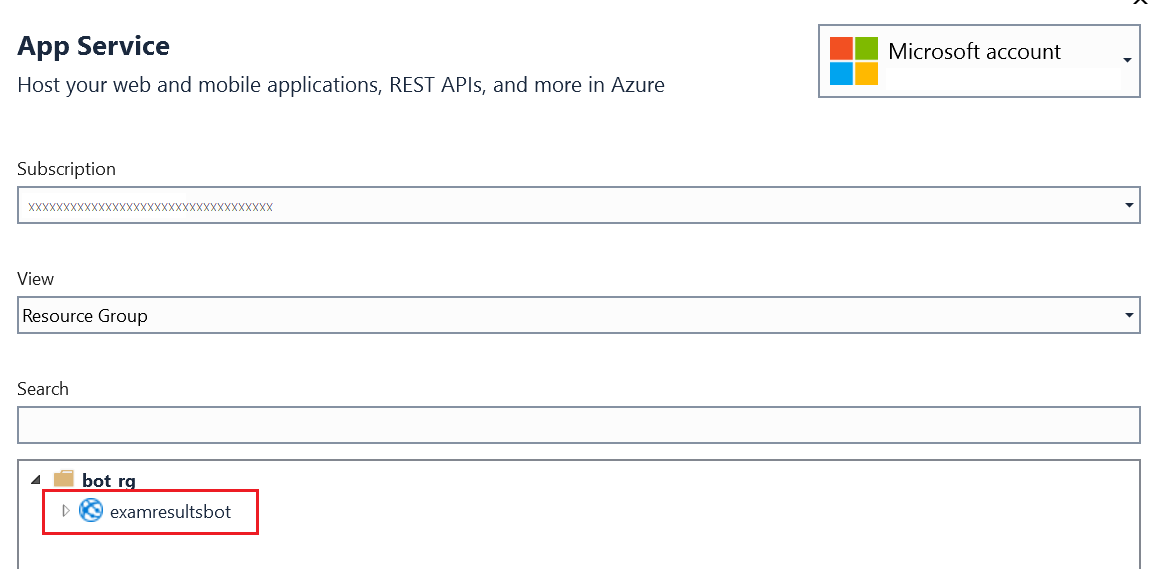
  • Right click on the project and hit "Publish" Select "Existing" and "App Service" from the list and click "Publish"
  • The system will automatically recognize your bot service in Azure and will show in the list. Select it and hit "OK"

Wait for few seconds if not minutes for publish to finish. The browser will launch to notify that the bot is up and running


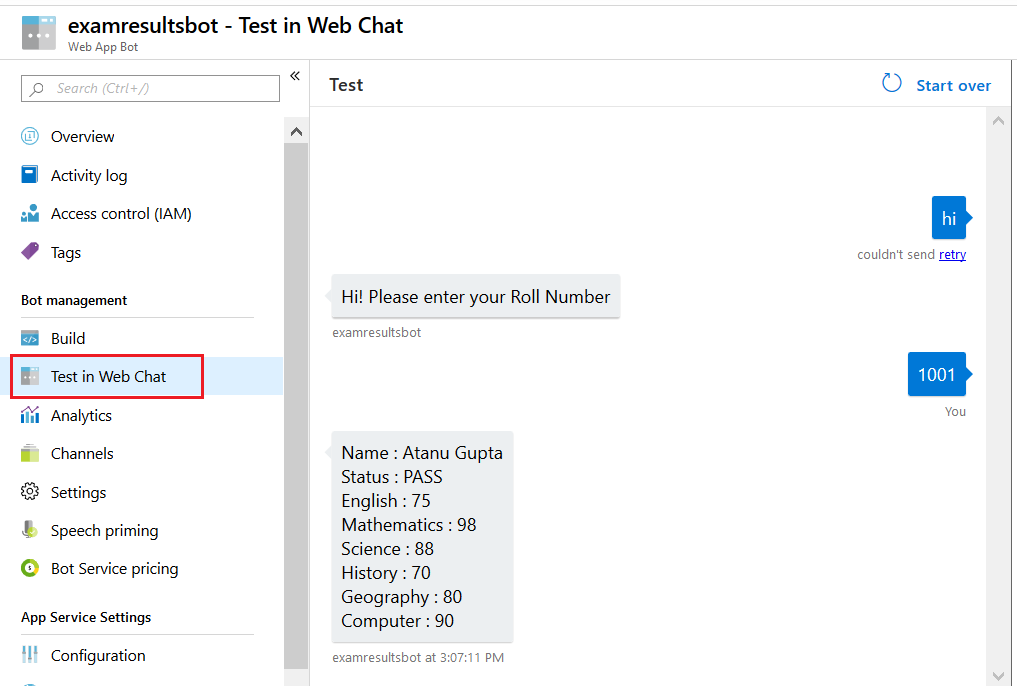
You can test it in cloud by going to the "Test in Web Chat" window of the bot service. Say "hi" and then the rest would follow as usual.


Cool! You have done it 👍

You might be thinking that OK, that's fine but how to use in an web application. Great question. What's the use of this bot if we cannot embed it in our application. For that go to the "Channels" property page of the bot service and select Edit against your Web Chat line item. The html embedding code is already generated for you. Just copy the code and replace the YOUR_SECRET_HERE section with any of the secret key as highlighted and you are good to go.


Congratulations! for coming this far. Hope this article will boost up your self confidence and would encourage you to further explore this service.

Do share with me about your experience and what you have built upon this foundation. You can take it upto any level and integrate. I would love to hear from you.

04 June, 2019

Artificial Intelligence : Celebrity Recognition Bot!

Computer Vision is a field of computer science that works on enabling computers to see, identify and process images in the same way that human vision does, and then provide appropriate output. It is like imparting human intelligence and instincts to a computer. In reality though, it is a difficult task to enable computers to recognize images of different objects.

Computer vision is an important subject in the field of artificial intelligence, as the computer must interpret what it sees, and then perform appropriate analysis or act accordingly.
The Microsoft Azure Computer Vision API allows us to process an image and retrieve information about it. It relies on advanced algorithms to analyze the content of the image in different ways, based on our needs. In this article I will try to walk you through the various angles on which we humans see images and how accurate the computer is in matching our visions. Hope you all would enjoy the journey!


Please note that I have purposefully left out some complex areas or haven’t deep dived into details somewhere inorder to make this article an easy read and help as a quick guide from where to start in the Microsoft Azure Cognitive space.

Prerequisites:
  • Microsoft Visual Studio 2017 (Though you can try with VS2015, but this demo is on VS2017)
  • Azure Subscription (Free subscription of 30 days will also do)
  • Basic C# programing knowledge

Getting up the Vision API in Azure

  • Login to Azure (If you do not have any subscription already then create one else login to your existing one)
  • Click the “+ Create a resource” option
  • Search for “Vision” in the search box and select “Computer Vision”
  • Click “Create”
  • Fill up the necessary details and click Create. The Name, Resource Group and location you can choose as per your preference.
  • Wait few seconds for Azure to create the service for you. Once created it will take you to it’s landing page (Quick start)
  • Now select the “Keys” property and copy the Key 1. You can also copy Key 2 if you wish as any one will solve the purpose. Keep it in a notepad. Will need this later.

  • Select the Overview tab and copy Endpoint. Keep it in a notepad. Will need this later.
  • We are done setting up the Vision API in Azure

Visual Studio Application – To see the action

  • Open visual studio 2017 and select File >> New >> Project. Select “Windows Form App (.Net Framework)” as your project type. Please note that Visual C# is my default language selection. Choose the project name as per your wish (I have given VisionAnalysis_AI)
  • Now in order to use the Vision API, we need to add a reference to the Microsoft.ProjectOxford.Vision NuGet library. So, right click on the project >> Manage NuGet Packages. Browse for the library and install.
  • Add the Newtonsoft.Json NuGet library the same way. We will use this to parse the Json result later in the code
  • Create a form layout with one button (Name : btnBrowseAnalyse), FileDialog (Name: openFileDialog), picture box (Name : PictureBox) and a read only text box control (Name : txtImageAnalysis). The button is for browsing a celebrity image file using file dialog, the picture box is for showing the image and the text box for the analysis result. Simple! I am sure you'll come up with a far better UI design 😊

✱ Open the Form’s code behind and add the following using statement at the top
using Microsoft.ProjectOxford.Vision;
using Newtonsoft.Json;
using Newtonsoft.Json.Linq;
✱ Open App.Config file. (Add this file to the solution if not already exists). Add the following settings under section
<appSettings>
<add key="VISION_API_KEY" value="Subcription key copied in notepad" />
<add key="VISION_ROOT_URI" value="Endpoint url copied in notepad" />
</appSettings> 
✱ Declare the following variables at the top of the class
IVisionServiceClient _visionClient;
string VISION_API_KEY = string.Empty;
string ROOT_URI = string.Empty;
✱ Append the following piece of code in the constructor method of the class. This is just to read the settings from the config file at the start of the program.
VISION_API_KEY = ConfigurationManager.AppSettings["VISION_API_KEY"];
ROOT_URI = ConfigurationManager.AppSettings["VISION_ROOT_URI"] + "vision/v1.0"; //appending the version 
✱ Double click the button “btnBrowseAnalyse” to land directly into its click event. Add the following lines of code inside the event.
//Setting up the file dialog for image files. You can configure it to accept more file types like png, etc
openFileDialog.Filter = "JPEG Image (*.jpg) | *.jpg";
if (openFileDialog.ShowDialog() == DialogResult.OK)
{
   //Clearing the text box before the analysis
   txtImageAnalysis.Text = string.Empty;
   //Storing the selected image local file path to a variablestring filePath = openFileDialog.FileName;
   //Initializing the image as bitmap image and showing it in the picture box Bitmap
   image = new Bitmap(filePath);
   PictureBox.Image = image;
 
   //Function to do the image analysis and ultimate results. Passing the file path as reference
   doImageAnalysisAsync(filePath);
} 
✱ The code for the image analysis in the doImageAnalysisAsync method. It’s doing an analysis of the image based on various params just we humans do. The method looks a bit creepy but the code is very simple
private async Task doImageAnalysisAsync(string filePath)
{
    _visionClient = new VisionServiceClient(VISION_API_KEY, VISION_ROOT_URI);
    string[] SelectedFeatures = new string[] { "categories", "description" };
 
    try
    {
       using (FileStream fileStream = File.OpenRead(filePath))
       {
          //Invoking the Vision API for analyzing the image
          var result = await _visionClient.AnalyzeImageAsync(fileStream, SelectedFeatures);
          StringBuilder analysisText = new StringBuilder();
 
          //Start image analysis for recognising celebrities in Imageif (result != null)
          {
             if (result.Categories.Count() > 0)
             {
                analysisText.AppendLine().AppendLine("Categories:");
                analysisText.AppendLine("------------------------------------------------------------------------------------------------------------------------");
                analysisText.AppendLine(result.Categories[0].Name + " (Score : " + result.Categories[0].Score.ToString() + ")");
 
                if (obj != null && obj["celebrities"] != null && obj["celebrities"].Count() > 0)
                {
                   analysisText.AppendLine().AppendLine("Celebrity (Count : " + obj["celebrities"].Count().ToString() + ")");
                   for (int i = 0; i < obj["celebrities"].Count(); i++)
                   {
                      analysisText.AppendLine("Name : " + ((Newtonsoft.Json.Linq.JValue)obj["celebrities"][i]["name"]).Value  + " (Confidence : " +
                      ((Newtonsoft.Json.Linq.JValue)obj["celebrities"][i]["confidence"]).Value  + ")");
                   }
               }
               else
                  analysisText.AppendLine().AppendLine("Celebrity : No");
             }
          }
       //Display the celebrity analysis result
       txtImageAnalysis.Text = analysisText.ToString();
       }
    }    
    catch (Exception ex) { MessageBox.Show(ex.Message); }
}
Congratulations! for coming this far. Your intelligent celebrity recognition bot is now ready. Build and press F5 to run the program.

Hit the browse button and select a celebrity image from your local machine. The image will show up in the picture box and the system will immediately start to analyze the image to find out the celebrity in it. If found, the details will be show else it will show “Celebrity: No”

Example: Picture of “Bill Gates” provided for checking. Voila! It’s identified with confidence rate close to 100%. Remember with naked eyes we can easily identify but here your small piece of AI code is doing the trick for you. It's imitating humans!


Take another example. Lets give it an image containing group of people with a celebrity present in there. Can it identity from a group as well? YES! it does with near to 100% accuracy.


Now let’s try with a bunch of celebrities in a single image. It worked. Amazing! It managed to get 7 celebrities out of it with names of each along with the accuracy rate. Quite Impressive.. isn’t it.


Well Done! Your Celebrity Recognition bot is up and running.

Do share with me about your experience and what you have built upon this foundation. You can take it upto any level and integrate. I would love to hear from you.