Showing posts with label Web App. Show all posts

14 July, 2021

3. Azure Arc : Running Azure App Service in Azure Arc Enabled K8s

In the first article of my Azure Azc series; we have successfully onboarded an Azure Kubernetes Service (AKS) cluster into Azure Arc enabled Kubernetes. If you haven't followed that yet, I highly recommend you to visit that article first and configure your clusters if you want to follow along.

1. Azure Arc : Setting up 'Kubernetes - Azure Arc' with AKS cluster

In this article we would run an Azure App Service - Web App inside our Azure Arc for Kubernetes cluster. 

Hang on! Just read the above statement again. Azure Arc is meant for hybrid, multi-cloud capability and running an application on that doesn't mean that we can run it on any cloud behind the scene? Yes, your are right 😊, your Azure App Service can now run anywhere; hardly matters its on-premise or on any other cloud provider's platform. Sounds Interesting! Let's dive.

  • Lets go inside the resource group (arc-rg-01 in my case) where we have both our Kubernetes service cluster and the Kubernetes - Azure Arc cluster.
  • We would need a public static IP address to configure our app service which we would see shortly. So, for now just go ahead and create a public ip address in the your managed cluster (MC_) resource group (because I am running my AKS cluster in Azure) before moving forward. I gave the name as "my-webapp-arc-pip" leaving all other setting as default.
  • Once done... copy the IP address and keep it in notepad. 
  • Search for "Azure Arc" in the search bar (azure portal) and select it from the result
  • Choose 'Kubernetes clusters' under Infrastructure to find your Azure Arc for K8s cluster.
  • Click on that, choose "Extensions (preview)" and then click +Add. The extension is in preview at the time of writing this article but its works perfectly. So, go ahead.
  • Select "Application services extension (Preview)"
  • Give your instance name, create a custom location and put the public ip address (copied to your notepad) in the static ip textbox. This custom location will show up in your azure region list once we configure the web app. This is again a magic which we will see shortly 😊
  • Click Next, Next and at the "Run Script" section, it will automatically generate the required PowerShell script which you need to download or copy to clipboard so that you can run it using any powershell platform. 
  • I just copied it to clipboard but don't run it straightway. We need to enable the custom-location feature for our k8s cluster (do not confuse this with arc cluster). This is a very important step often get missed; else the generated powershell script would fail throwing permission denied error. So, let's go ahead and run the below script. Replace the values as per your environment.
az extension add --name customlocation
az connectedk8s enable-features -n "<cluster-name" -g "<resource group>" --features cluster-connect custom-locations
  • Now run the generated PowerShell script.  I ran it using PowerShell ISE editor but you are free to use any of your choice. The script would take a while to finish, so go grab your favorite beverage and relax. I already took mine 🍺
  • On successful completion of the script, you will see the "microsoft.web.appservice" extension has been installed successfully in your cluster.
  • Now check the Custom locations under Management to find that the custom location has also been created successfully.

Great! now we are all set to create a app service (web app) and run in on out K8s Arc cluster. So, lets get goingπŸ˜‰
  • Click "App services" under Services and click to create a new web app
  • Now in the next screen before doing anything, click the region dropdown. Voila! our new custom region shows up. Yeah! its right there.... amazing. Select that.
  • Fill up other details as required. You might have also noticed by this time that url has also changed on change of custom location as a region. This is enough to tell us that this not an ordinary azure app service which we use to create. I have selected the runtime stack as .Net core  but you are free to choose any of your choice. Review and create.

  • Once complete, check the "App services" under Services to find our service.
  • Click on that and get the URL. Run it!


A big virtual High Five!!!! We have done it!. 

Now our Azure app service is running on Azure Arc for K8s cluster and the underlying cluster can be anywhere.. on-premise, any cloud provider's platform, wherever... We just do not mind πŸ˜‹

We can keep deploying our code to this app service manually, from VS or by DevOps pipeline and let Azure do all the heavy lifting to host that in a multi cloud platform.

Congratulations! for coming this far. Hope this article will help you to further explore more on this topic.

Do share with me about your experience and what you have built upon this foundation. You can take it upto any level and integrate. I would love to hear from you.

07 July, 2021

2. Azure Arc : Deploying .Net Core App into Azure Arc enabled K8s with Git Ops


In the first article of my Azure Azc series we have successfully onboarded an Azure Kubernetes Service (AKS) cluster into Azure Arc enabled Kubernetes. If you haven't followed that yet, then I highly recommend to visit that article first as we will continue to build on that cluster.

1. Azure Arc : Setting up 'Kubernetes - Azure Arc' with AKS cluster

We will also make use of Git Repository and Docker Hub registry. For this article, I will be using my public repo and hub but you are free to use yours.

  1. PassHours/Hello-AzureArc (git repo)
  2. atanudochub/helloazurearc (docker hub registry/image)

I have already developed a sample .Net core web app and uploaded it in my git repository. It's a very basic web app to display a welcome screen "Welcome to Azure Arc" but you got the idea 😊


The application is containerized and the image has been uploaded in my docker hub registry.


So, the platform is all set for us to proceed.
  • Lets go inside the resource group (arc-rg-01 in my case) where we have both our Kubernetes service cluster and the Kubernetes - Azure Arc cluster.
  • Get into the Kubernetes - Azure Arc cluster and click the "GitOps" option from the left menu. It will be empty as we have configured nothing yet.
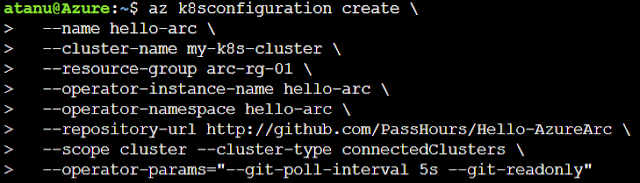
  • Now the interesting part. We would like to deploy our Hello-AzureArc containerized application into our AKS cluster through the Azure Arc for Kubernetes GitOps channel and you would be surprised to see that how easy it is. Microsoft has done a great job in simplifying things here by providing a single command πŸ‘‰ az k8sconfiguration create. All the heavy duty complex operations are taken care behind the scene for you. 
az k8sconfiguration create \
  --name <<your choice>> \
  --cluster-name <<your cluster name>> \
  --resource-group <<your k8s cluster resource group>> \
  --operator-instance-name <<your choice>> \
  --operator-namespace <<your choice>> \
  --repository-url <<your git repo url>> \
  --scope cluster --cluster-type connectedClusters \
  --operator-params="--git-poll-interval 5s --git-readonly"
I have issued the following command in the cloud bash shell of Azure portal. You can also issue the exact same command if you are following along with me else replace the values accordingly. I have scoped the deployment to cluster level but you can also scope it to namespace level as well.


The interesting part to note here in the command is the last line --operator-params. This is the param where you are applying your gitops command. I am giving the command instruction here to poll my git repo (as mentioned in the --repository-url param) every 5 seconds (bit aggressive here for this demo but in real life it would be much higher value, may be every 30 mins), get all the changes and apply in my cluster. A typical continuous deployment scenario. 
  • Upon completion, you will find the configuration (hello-arc in my case) showing up under the GitOps menu. The Operator state will show "Pending" first and then will turn to "Installed" after completion of the deployment process. So, have some patience here.
  • It signals done but we need to verify. Lets check our AKS cluster now in the following sequence in the Kubernetes resources section.
πŸ‘‰ Namespace. hello-arc is our namespace created successfully


πŸ‘‰ Workloads. Select the "Pods" tab and filter it by "default" namespace as we have not mapped it to any particular namespace and hence default. Three pods are up an running successfully.
Refer hello-azurearc.yml deployment yml in the git repo


πŸ‘‰ Services and ingresses. Our hello-arc-service is up and running having an external load balancer IP address.
Refer hello-azurearc.yml deployment yml in the git repo

  • Click the External IP and voila! our app is running as expected. Auto magic isn't it πŸ‘Ό We have just issued a single command and surprise!

So, I believe it's enough to witness the power of Azure Arc for Kubernetes. I have just touched the tip of the iceberg; purposefully avoided going deep as this could unnecessarily confuse readers and make the article long and complex. But you can explore. πŸ‘

The most significant part is that your kubernetes cluster can be running anywhere (on premise or on any cloud); the process is exact the same. You can manage and deploy apps into your clusters running anywhere sitting right on Azure. Cool !

Now if you make any changes in your application; just dockerize it; update the image with a new version number and upload it to the registry. The git operation will fire up automatically; would read that from your deployment yml in the git repo; download the image from your container registry and deploy it in your cluster behind the scene as a part of continuous deployment.

You can also run all your kubectl commands on the cluster and it works just fine

That's it. 

Congratulations! for coming this far. Hope this article will help you to further explore more on this topic.

Do share with me about your experience and what you have built upon this foundation. You can take it upto any level and integrate. I would love to hear from you.

11 May, 2020

Azure Key Vault Referencing

Company: We have a simple web application developed in Asp.Net (.aspx pages) with few users and want to migrate that to Azure quickly with no changes.
Me: OK. Will simply host that web application to Azure App Service (Web App) 😊

Company: But the application has secrets hard-coded in the web-config file
Me: OK.. no problem. Will put those secrets in Azure Key Vault and will get rid of those hard coded values from the config 😊

Company: But that will need hard coding of the Key Vault access requirements back in web.config
Me: OK.. will use Azure Managed Identity to access the Key Vault and bypass this hard coding issue all at once. 😊

Company: But that will introduce code changes in the application which we do not want
Me: 😏πŸ’₯

Ha Ha!! a great design conversation, right! and what will be your answer this time. Take a pause and think for 10 secs.... If you are thinking about the new Key Vault referencing feature ... you are bang on target πŸ‘

Let's dive and see what's it all about.

Assuming the web application  have a configuration settings as below
<appSettings>
    <add key="TopSecret" value="Top Secret message from Application configuration" />
</appSettings>
And its accessing this value in the Page_Load event
protected void Page_Load(object sender, EventArgs e)
{
   var secretMsg = ConfigurationManager.AppSettings["TopSecret"];
   ViewState["TopSecret"] = secretMsg;
}
And displaying the value in the page
<div>            
   <span style="font-weight:bold; font-size:larger;"><% =ViewState["TopSecret"] %></span>  
</div>

Now our challenge is to deploy this application in the cloud without any code changes.

  • Create an Azure Web App and deploy this application. Now go to the Identity under Settings  and make sure you switch on the System Assigned status as below
  • Create a Key Vault and then add a new access policy (Settings >> Access policies >> + Add Access Policy. Make sure you give Secret permissions as 'Get' to your application and create a policy similar as below. Click Add and then Save.

  • Add a secret now to your Key Vault. I have given the name as "TopSecret' and value as "Top Secret message from KeyVault configuration". You can give anything as per your choice. Click Create.
  • Now click "TopSecret" from the "Secrets" dashboard and copy its version number
  • OK.. Now open notepad and generate a string like this below. 
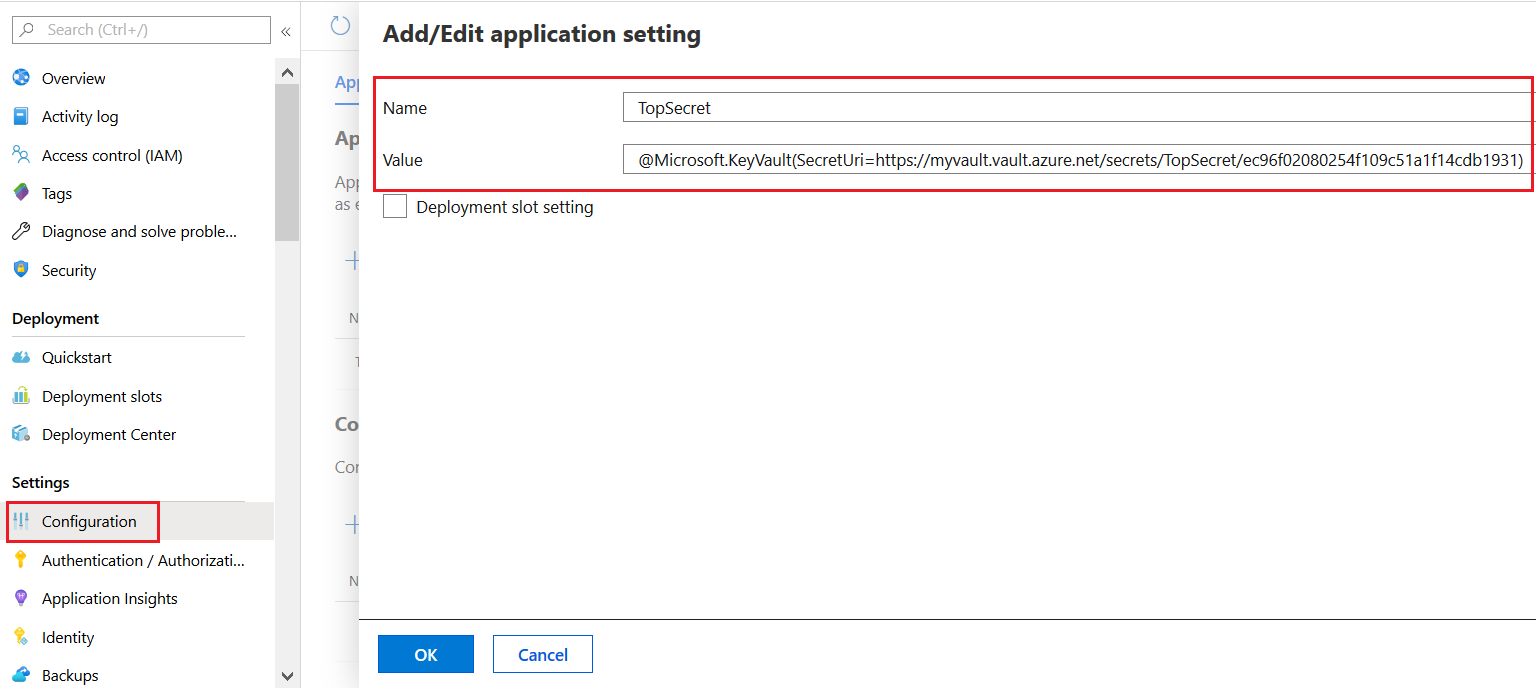
@Microsoft.KeyVault(SecretUri=https://myvault.vault.azure.net/secrets/TopSecret/ec96f02080254f109c51a1f14cdb1931)

Replace the highlighted (red) parts with your values. These are nothing but the name of your Key Vault, name of the Secret and the version number of that secret you just copied.
  • Now go to your web app and open Settings >> Configuration and add a new application settings. Give the name same as it was there under in the web.config file (scroll up to see that section). This is important. In our case it's "TopSecret". The value of this settings should be the string you just constructed above. Click OK and Save.

  • Run the application in the cloud and voila ... the application is reading data from the Key Vault and not from the application web.config anymore. And that too with noooooo code changes.
Great Job and Congratulations! for coming this far. Hope this article will help you to further explore this feature.

Do share with me about your experience and what you have built upon this foundation. You can take it up to any level and integrate. I would love to hear from you.

10 March, 2020

Azure Web App for Containers + Docker Compose

There is a lot of talk around containerization nowadays. Everyone seems to be jumping into this bandwagon and thinking in terms of dockers and containers only. Cloud has also given a big boost towards it and made it even more popular by providing the platform with lot of flavours for containerization. Azure "Web App for Containers" in one such service which though not very popular among developers like Azure Kubernetes Service and Service Fabric but has a lot of sweet potentials.

We will investigate a great feature of this service today. We will create a sample Web app and an API app, containerize those and will leave it to the "Web app for containers" service to do all the necessary plumbing work and making sure our application is up and running. To make it more fun, we would only make use of Visual Studio  mostly in our demo and will only switch to Azure for customization purpose. Sounds interesting... Let's get started.

Prerequisites:
1.    Azure Subscription (Free subscription of 30 days will also do)
2.    Microsoft Visual Studio 2017
3.    Docker Desktop for Windows - this should be installed first, up and running
4.    Basic C# programming knowledge
  • Open VS 2017 and select File >> New >> Project. Select ".Net Core" and "Asp.Net Core Web Application" as the template. I have given the name "MyWebApp" as the project name, but you are free to give anything of your choice.
  • Select the following in the next screen. Since this is going to be web application, hence the web application (model-view-container) option is selected. I have taken Asp.Net Core 2.1 as the latest version. Leave other parameters as default and click OK to create the project.
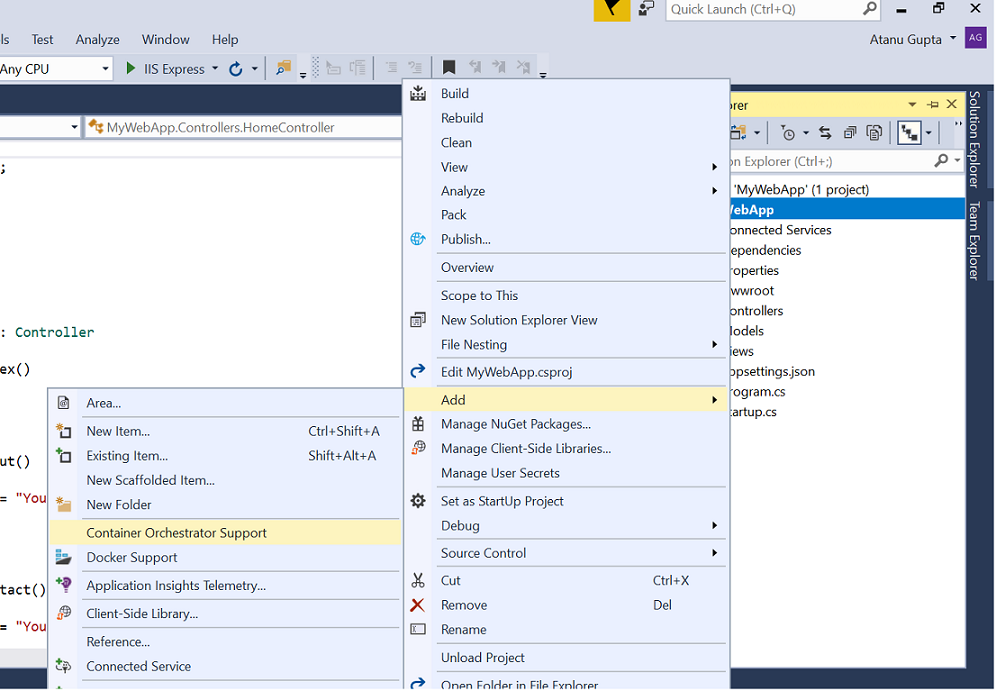
  • Right click on the project to add container orchestrator support as below.
  • Select "Docker Compose" from the drop-down and click OK
  • Select target OS as "Linux" and click OK to complete the process
  • Now let's see how VS has configured our web project. A Docker file got added along with a new project name docker-compose. The magic here is that our application now has got docker along with orchestrator support and we do not need to change a single line of code in any of the files. VS has done all the necessary handshaking.  

Let's add the API project. 
  • Right click on the solution and add a new project. I have given the name "MyApiApp" but you are free to give any name of your choice
  • The time select the API as a template and un-check the HTTPS configuration checkbox as we would not require it this time.
  • Now follow the same steps you have done to add docker container orchestrator support in this project as well. Remember... it's the exact same steps. If you have performed it right, your project structure should look similar to this

  • And the docker-compose.yml should look like this.

Now let's introduce some activity in the boilerplate projects.
Open the Controller/ValuesController.cs file under the API project and replace the first Get() function with the below code block. This is just returning the current short time to the calling application.


// GET api/values
[HttpGet]
public ActionResult<string> Get()
{
   return "" + DateTime.Now.ToShortTimeString();
}


Let's call this api from our web application and display the value accordingly.
Open the Controller/HomeController.cs file under the Web project and replace the Index method with the below code block. Here we are just calling the api app get() method to get the current time and storing it into a ViewData.

public async Task<IActionResult> Index()
{
   using (var client = new System.Net.Http.HttpClient())
   {
      var request = new System.Net.Http.HttpRequestMessage();
      request.RequestUri = new Uri("http://myapiapp/api/values/"); //Docker compose will automatically map the underlying IP
      var response = await client.SendAsync(request);
      ViewData["msg"] = "The current time is : " + response.Content.ReadAsStringAsync().Result;
   }
   return View();
}

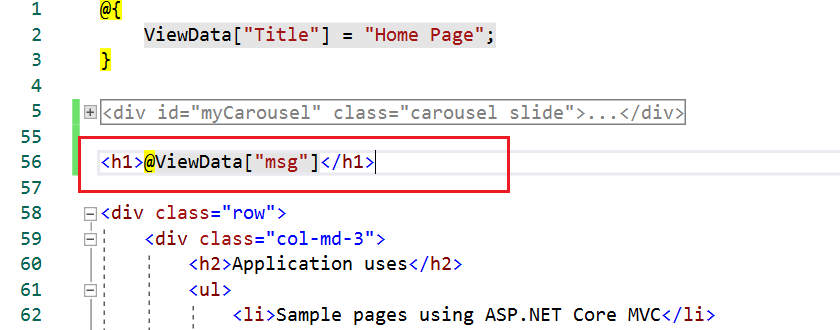
Open the Views/Home/Index.cshtml page and display the ViewData message just after the Carousel
as below. But yes again you are free to add this message anywhere in the page.


Done with the local setup. Now press F5 to build and run the solution. This will now build container images for both of your web and api application and would launch the project as a container application in a browser. The time (as highlighted below) is coming from the API get() call. Refresh the page and you would see new time every minute.


Great... our application is now containerized and working seamlessly together. What we have done? simply nothing... in fact no docker knowledge needed. All the heavy-duty work is happening behind the scene 😊 

Let's host it in the cloud. Here we need to perform two things
1.    Host the docker images in Azure Container Registry (ACR)
2.    Create an Azure Web App for Containers service to run those images
Make sure you are connected to your Azure subscription from within you Visual Studio IDE.
Right click on the API project and hit "Publish" from the context menu and follow the below steps
  • Select "Container Registry" and then "Create New Azure Container Registry". Click Publish.
  • All the fields will be automatically populated. I preferred to leave the DNS prefix as is (you can change it as per your convention) for this demo and make sure the right subscription is selected (in case you have multiple subscriptions). You can select an existing resource group or create new. I have created a new one. Select he SKU as Basic as this is enough for this demo and select the location of your choice. Click "Create"
  • Now have some patience. Azure will create the ACR for you and would also publish the docker image related to the API app into it. This will take few minutes.
  • Once done, do the same operation for the Web application as well. But this time select the existing container registry you created in the step one.
  • Now Login to Azure (atlast πŸ˜‰)
  • Find your resource group (in my case it's my-web-app-rg) and click to see the details in it.
  • You will find the container registry you created
  • Click the container registry. Then click the Repositories (under services) option from the panel. You must see the two docker images you had just published from your visual studio


Now we are all set to create a web app which will run these images. No code or DLLs to deploy. The docker images are self-contained and the rest will be taken care by the azure platform. Sounds great. So, let's create one.
  • Search for "web app for container" in the Azure search bar and select it

  • Fill up the form with the necessary details and click "Next:Docker".
  • Select the values as shown below. The "docker-compose.yml" configuration file you will find in your project directory. But before uploading the file you need to make a very important change. Replace the ${DOCKER_REGISTRY-} variable with the Azure container registry login server name which you will find under the overview tab of the ACR (in my case it's myapiapp20200120095948.azurecr.io).
         Hence the updated docker-compose.yml stands like below

 
 Click "Review + create". Then click "Create". This will fire up the "Web app for containers" setup. Wait for few minutes.
  • Go to your resource group to find the below services in there
  • Click the web app service and hit the Url from the Overview page which will launch your web application in the browser with the time stamp picked up from your API app


Voila!... your web application is now running two container images behind the scene. You can now leverage the power of both docker and azure web app in building a robust and scalable application which is totally based on PaaS. Isn't it a great service?

You can also fully automate the above processes with DevOps. πŸ‘

Congratulations! for coming this far. Hope this article will boost up your self-confidence and would encourage you to further explore this service.

Do share with me about your experience and what you have built upon this foundation. You can take it up to any level and integrate. I would love to hear from you.