Showing posts with label JSON. Show all posts

28 December, 2020

Mocking data in Azure Logic Apps

In any distributed system development, various pieces of an application gets developed by multiple teams from different parts of the geography. This is a OK till you hit a roadblock when you cannot proceed until another team finishes their work and provide the data you need. In today's microservices design model this is even more relevant where you need a dependent service to return the data you need so that you can complete your work.

This type is scenario is inevitable and you cannot help but rather have to live with it. So what to do? πŸ˜’ 

Mocking!! Yes you are right. Why not mock the data you need to finish your work and later just do the plumbing work with the actual service when it's up and ready to throw back actual data. This is a great idea where teams can work on their own schedule without waiting and running after each other.

In Azure, when it comes to mocking, developers often fall back on API Management to implement this with the help of APIM polices. But why going for such costly idea where the need is only to mock data when you can use your other friend Logic Apps to achieve the same. Let's check it out πŸ‘

Scenario:

We need to get the employee details from the database service (developing by the back-end team) by passing the employee code. But the back-end team is not yet there and hence we need to mock the employee details.

Let's get started.


Define an http endpoint where we will send the employee code as below


Add a new action and search for the HTTP action


Fill the details as per your requirement. In my case it's a GET call with the following details.


As mentioned the URI is the service that's getting developed by the backend team which is not yet ready. So, in this action we have to inject out mocking logic. 

Click the "..." eclipse at the top right section of the action and select "Static result (Preview)" from the context menu. Yeah it's preview but works just fine. Go ahead!

Enable the Static result to get the following window. The default selections are good to go for our mocking purpose


But strangely there's no place to provide the static json response content here. Don't worry! It's there but we need to tweak a bit πŸ˜‰

Hit the JSON mode icon to switch to the JSON view mode as below


Now here in the outputs section paste your return JSON in a body tag as below. I just need the employee first_name, last_name , "dept" and "rank" from the database service. So, I have mocked that piece as the back-end service is not yet ready and I can continue with my development πŸ˜ƒ


Hit Done as return to the workflow. Now you will find a new icon added to the action which denotes that this action has a static result configured


As a last step let's add an "Response" action in the workflow and return back the employee details to the caller. 


Save your logic app.

Done! let take a bird's eye view of our logic app workflow. This will help you to match if you are doing it in parallel along with this article


Testing time! Copy the http endpoint from the trigger (first action) and paste it in any rest client to make the call. I have used postman rest client as below. Hit Send and get your static result back.


That's it. You have successfully implemented mocking and what a cool way to do so. 

Isn't that great! 

Congratulations! for coming this far. Hope this article will help you to further explore more on this feature.

Do share with me about your experience and what you have built upon this foundation. You can take it upto any level and integrate. I would love to hear from you.

29 September, 2020

Azure Logic App Integration : Transform XML to JSON

In Enterprise Integration or iPaaS, a scenario that often comes up is to convert a XML payload to Json. You might be receiving XML data from one system but needs to convert that to JSON before pushing it to another system. If both the source and destination systems understands same language then it's OK but that is not always the case. So, there's a challenge.

Azure Logic App has some cool power and we will try to leverage on such in our integration scenario. Here our legacy source system can only send XML data but our destination system only understands JSON. 

Prerequisites:

  • Azure Subscription (Free subscription will also do)
  • Basic XML, XSLT understanding
  • Basic JSON understanding
  • Azure Logic App basic Request/Response understanding
Let's get Started
  • Create a simple xml document (Vendor.xml). This is the payload our source system will send.
<?xml version="1.0" encoding="UTF-8"?>
<Vendor>
   <VendorNumber>VND1</VendorNumber>
   <VendorName>My Vendor</VendorName>
   <GroupId>10</GroupId>
   <Company>USRT</Company>
   <VendorCity>My City</VendorCity>
   <VendorContactPhone>1234567890</VendorContactPhone>
   <VendorContactEmail>myvendor@vendoremail.com</VendorContactEmail>
<VendorCountryRgn>USA</VendorCountryRgn> </Vendor>
  • But our destination system only understands JSON. Now we need to transform the above XML into JSON keeping all other information intact. So after transformation the data should look like this
{
   "VendorNumber":"VND1",
   "VendorName":"My Vendor",
   "Company":"USRT",
   "VendorCity":"My City",
   "VendorContactPhone":"1234567890",
   "VendorContactEmail":"myvendor@vendoremail.com",
   "VendorCountryRgn":"USA"
}
  • Looks simple! but not that simple in Logic App. There's a few marketplace connectors available but that won't help much when it comes to customization and also they not free and has licensing and pricing model complexities. So why to go that route when we have a free yet powerful friend in hand which can do this task quite comfortably and also is a first class citizen in Azure Logic App. XSLT Transformation. 
Here goes our Vendor.xsl document. Save it in your machine as you would need this later. It's quite simple and self-explanatory. XSLT has immense power and hence you can understand what level of control you will have in handling XML complexities.
<?xml version="1.0" encoding="UTF-8"?>

<xsl:stylesheet version="1.0" xmlns:xsl="http://www.w3.org/1999/XSL/Transform">
<xsl:output omit-xml-declaration="yes" method="text" media-type="application/json"/>
    <xsl:template match="/">
        <xsl:text>{ </xsl:text>
        
        <xsl:text>"VendorNumber" : "</xsl:text>
        <xsl:value-of select="Vendor/VendorNumber"/>
        <xsl:text>", </xsl:text>
        
        <xsl:text>"VendorName" : "</xsl:text>
        <xsl:value-of select="Vendor/VendorName"/>
        <xsl:text>", </xsl:text>
        
        <xsl:text>"Company" : "</xsl:text>
        <xsl:value-of select="Vendor/Company"/>
        <xsl:text>", </xsl:text>
        
        <xsl:text>"VendorCity" : "</xsl:text>
        <xsl:value-of select="Vendor/VendorCity"/>
        <xsl:text>", </xsl:text>
        
        <xsl:text>"VendorContactPhone" : "</xsl:text>
        <xsl:value-of select="Vendor/VendorContactPhone"/>
        <xsl:text>", </xsl:text>
        
        <xsl:text>"VendorContactEmail" : "</xsl:text>
        <xsl:value-of select="Vendor/VendorContactEmail"/>
        <xsl:text>", </xsl:text>
        
        <xsl:text>"VendorCountryRgn" : "</xsl:text>
        <xsl:value-of select="Vendor/VendorCountryRgn"/>
        <xsl:text>" </xsl:text>
        
        <xsl:text> }</xsl:text>
    </xsl:template>
</xsl:stylesheet>
  • We are done with our basic ground work. Now it's time to step into Azure. πŸ˜ƒ
  • Login to Azure portal 
  • We cannot apply this XSLT file straightway on our input XML in Logic App. For that we need to create an "integration accounts". Let's do that. Search for integration in the Azure search bar and select.
  • Click +Add at the top and fill up the necessary details as per your choice. Create the account.
  • Once the integration account is created it will take you to the following landing page. There are lots of components available but for the sake of simplicity I won't go into those as it's not required for your case. It's required for typical B2B scenarios and if you are keep to learn then Azure has good documentation around it.  Here we only need the Maps component. So click on that.
  • Click +Add at the top and upload your Vendor.xsl file. This is the XSLT file we have created earlier. Click OK
  • Great. Now let create the logic app for some real action. Search for Logic App in the Azure search bar and select.
  • Click +Add at the top and fill up the following details as per your choice. One important point to remember here. Make sure your logic app location is same as your integration account location. This is a requirement. Create your logic app.
  • Now the most important part. We need to tell the Logic App to use the integration account so that it could pick up the XSLT transformation map from there. Go to the Settings>>Workflow Settings and map your integration account. Click Save
  • Click Logic App designer under Development Tools and choose "When a HTTP request is received" trigger from the list of common triggers
  • This will take you to the logic app workflow designer with the above trigger as the first element in the workflow. Do nothing here and click the "Next Step"
  • Search for "Transform XML" and select Transform XML from the list of actions.
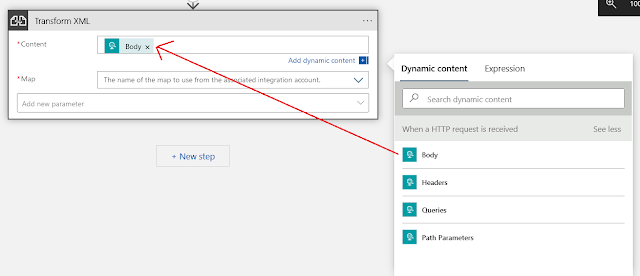
  • For Contents, select the Body from the Dynamic content list. The is the http request body which we are going to send as an XML payload later.
  • Choose the XSLT map from the "Map" dropdown. This is coming from your integration account where we have uploaded the Vendor.xsl file.
  • Now select the Add new parameter dropdown and select "Transform options" and the value as "Apply XSLT output attributes". This is very important else you will get a runtime error "Code": "InvalidXsltContent", "Message": "An error occurred while processing map. 'Token Text in state Start would result in an invalid XML document. Make sure that the ConformanceLevel setting is set to ConformanceLevel.Fragment or ConformanceLevel.Auto if you want to write an XML fragment. ".  This is to just to inform the runtime to use the output format as defined in the XSLT file which in our case is application/json. So, make sure you do not miss this step πŸ‘
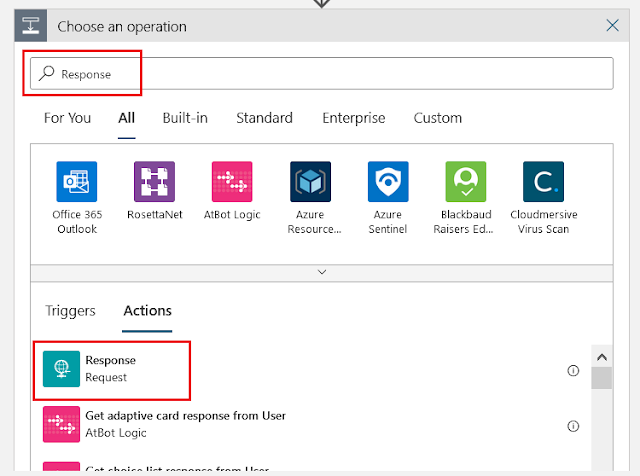
  • Now we do not have any real source and destination system for this demo. So, we would return back the transformed JSON to the caller to simulate the XML to JSON conversion. Click on "+New Step", search for "Response" and select the Response Action
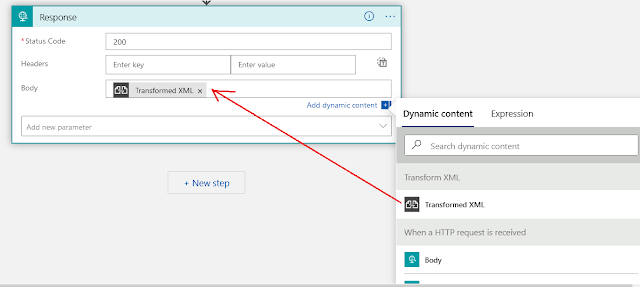
  • Select the "Transformed XML" from the Dynamic content selection window 
  • So, we have 3 steps in the workflow. Save the Logic app. This will generate the HTTP endpoint for us to test. Copy the HTTP POST URL endpoint and open any rest client of your choice. My favorite is Postman
  • Paste the url endpoint to make a POST call. In the body copy-paste the XML data from the Vendor.xml file we have created previously. Hit Send and Voila!! We are successfully getting back JSON response by sending XML request. Isn't that great stuff😚

Great Job and Congratulations! for coming this far. Hope this article will help you to further explore more on this feature.

Do share with me about your experience and what you have built upon this foundation. You can take it upto any level and integrate. I would love to hear from you.